
向所有使用Python编程语言的爱好者和专家致以问候!
在这篇文章中,我会告诉你如何与动画合作的跨平台Kivy框架与结合谷歌材质设计组件库- KivyMD。我们将研究Kivy项目的结构,其中使用材质组件来创建带有一些动画的测试移动应用程序。这篇文章将是很多GIF动画的不二之选,所以倒一些咖啡吧,走吧!
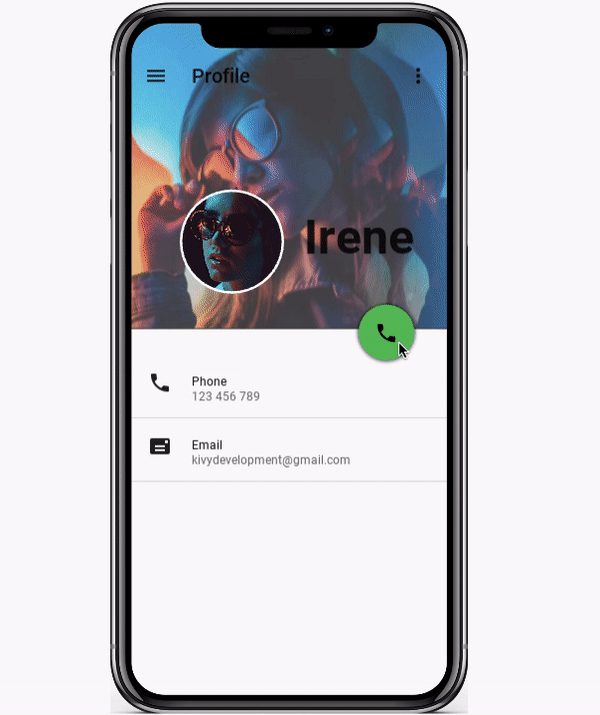
为了激起读者的兴趣,我想立即展示一下最终得到的结果:
因此,对于工作,我们需要Kivy框架:
pip install kivy
还有KivyMD库,它为Kivy框架提供了Material Design小部件:
pip install https://github.com/kivymd/KivyMD/archive/master.zip
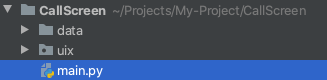
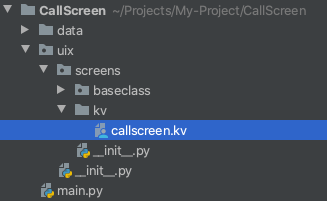
一切准备就绪!让我们打开PyCharm并使用以下目录结构创建一个新的CallScreen项目:

结构可以是任何结构。Kivy框架和KivyMD库均不需要标准目录之外的任何其他目录-项目根目录中必须有一个名为main.py的文件。这是应用程序的入口点:
在data / images目录中,我放置了应用程序所需的图形资源:
 |
 |
在uix / screens / baseclass目录中,我们将拥有一个具有相同名称的Python类的callscreen.py文件,在其中我们将实现应用程序屏幕操作的逻辑:

在uix / screens / kv目录中,我们将创建一个callscreen.kv文件(暂时将其留空)-用特殊的DSL Kivy语言描述UI :
创建项目后,我们可以打开callscreen.py文件并实现测试应用程序的screen类。
callscreen.py:
import os

from kivy.lang import Builder

from kivymd.uix.screen import MDScreen

#    KV
with open(os.path.join(os.getcwd(), "uix", "screens", "kv", "callscreen.kv"), encoding="utf-8") as KV:
    Builder.load_string(KV.read())


class CallScreen(MDScreen):
    pass
CallScreen 类继承自KivyMD库的MDScreen小部件(该库的几乎所有组件都以MD -Material Design为前缀)。MDScreen是kivy.uix.screenmanager模块中Kivy框架的Screen小部件的类似物,但具有其他属性。此外,MDScreen还允许您将小部件和控制器本身放置在另一个之上,如下所示:

这是在屏幕上放置浮动元素时将使用的定位。
在应用程序的入口点-main.py文件中,创建TestCallScreen类,该类从MDApp类继承而来,具有强制性的构建方法,该方法必须返回小部件或布局以将其显示在屏幕上。在我们的例子中,这将是先前创建的CallScreen屏幕类。
main.py:
from kivymd.app import MDApp

from uix.screens.baseclass.callscreen import CallScreen


class TestCallScreen(MDApp):
    def build(self):
        return CallScreen()


TestCallScreen().run()
这是一个显示空白屏幕的现成应用程序。如果运行main.py文件,我们将看到:
现在,让我们开始在callscreen.kv文件中标记UI屏幕。为此,您需要创建与基类同名的规则,我们将在其中描述小部件及其属性。例如,如果我们有一个名为CallScreen的Python类,则KV文件中的规则必须具有完全相同的名称。尽管您可以在代码中直接创建所有接口元素,但总的来说,这是不正确的。相比:
MyRootWidget:

    BoxLayout:

        Button:

        Button:
和一个Python类似物:
root = MyRootWidget()
box = BoxLayout()
box.add_widget(Button())
box.add_widget(Button())
root.add_widget(box)
很明显,小部件树在Kv语言中比在Python代码中更具可读性。此外,当小部件具有参数时,您的Python代码将变得一团糟,一天之后,您将无法弄清楚。因此,无论怎么说,如果框架允许您通过声明性语言描述UI元素,那么这是一个加号。好吧,在Kivy中,这是一个双重优点,因为在Kv语言中,您仍然可以执行Python指令。
因此,让我们从标题图像开始:
callscreen.kv:
<CallScreen>

    FitImage:
        id: title_image  # id
        size_hint_y: .45  #   (45%   )
        #  root     .
        #     <class 'uix.screens.baseclass.callscreen.CallScreen'>,
        #  self -    - <kivymd.utils.fitimage.FitImage object>.
        y: root.height - self.height  #    Y
        source: "data/images/avatar.jpg"  #
FitImage 小部件会自动拉伸以适应分配给它的整个空间,同时保持图像的长宽比:

我们可以运行main.py文件并查看结果:

现在,一切都很简单,是时候开始为小部件制作动画了。让我们在屏幕上添加一个按钮,方法是按下该按钮,将调用Python类CallScreen:callscreen.kv中的动画方法
:
#:import get_color_from_hex kivy.utils.get_color_from_hex
#:import colors kivymd.color_definitions.colors


<CallScreen>

    FitImage:
        [...]

    MDFloatingActionButton:
        icon: "phone"
        x: root.width - self.width - dp(20)
        y: app.root.height * 45 / 100 + self.height / 2
        md_bg_color: get_color_from_hex(colors["Green"]["A700"])
        on_release:
            #     .
            root.animation_title_image(title_image); \
            root.open_call_box = True if not root.open_call_box else False
使用Kv语言导入模块:
#:import get_color_from_hex kivy.utils.get_color_from_hex
#:import colors kivymd.color_definitions.colors
将类似于Python代码中的以下导入:
#  get_color_from_hex
#      rgba.
from kivy.utils import get_color_from_hex
#      :
#
# colors = {
#     "Red": {
#         "50": "FFEBEE",
#         "100": "FFCDD2",
#         ...,
#     },
#     "Pink": {
#         "50": "FCE4EC",
#         "100": "F8BBD0",
#         ...,
#     },
#     ...
# }
#
# https://kivymd.readthedocs.io/en/latest/themes/color-definitions/
from kivymd.color_definitions import colors
启动并单击绿色按钮后,我们得到-AttributeError:'CallScreen'对象没有属性'animation_title_image'。因此,让我们返回基类CallScreen文件callscreen.py并在其中创建一个animation_title_image方法,该方法将为标题图像添加动画。
callscreen.py:
#     .
from kivy.animation import Animation

[...]

class CallScreen(MDScreen):
    #        .
    open_call_box = False

    def animation_title_image(self, title_image):
        """
        :type title_image: <kivymd.utils.fitimage.FitImage object>
        """

        if not self.open_call_box:
            #       .
            Animation(size_hint_y=1, d=0.6, t="in_out_quad").start(title_image)
        else:
            #       .
            Animation(size_hint_y=0.45, d=0.6, t="in_out_quad").start(title_image)
就像您已经了解的那样,Animation类可能像在其他框架中一样,只是对小部件属性进行动画处理。在我们的例子中,我们将设置size_hint_y属性-高度提示的动画,在d参数-duration中设置动画执行间隔,并在t -type参数中设置动画类型。我们可以一次为一个小部件的多个属性设置动画,并使用运算符+,+ = ...组合动画。下图显示了我们的工作结果。为了进行比较,对于正确的GIF,我使用了in_elastic和out_elastic动画类型:
 |
 |
我们的下一步是向标题图像添加模糊效果。为此,Kivy具有一个EffectWidget。我们需要为效果设置所需的属性,并将标题图像小部件放置在EffectWidget中。
callscreen.kv:
#:import effect kivy.uix.effectwidget.EffectWidget
#:import HorizontalBlurEffect kivy.uix.effectwidget.HorizontalBlurEffect
#:import VerticalBlurEffect kivy.uix.effectwidget.VerticalBlurEffect


<CallScreen>

    EffectWidget:
        effects:
            # blur_value   .
            (\
            HorizontalBlurEffect(size=root.blur_value), \
            VerticalBlurEffect(size=root.blur_value), \
            )

        FitImage:
            [...]

    MDFloatingActionButton:
        [...]
        on_release:
            #    blur .
            root.animation_blur_value(); \
            [...]
现在,我们需要将blur_value属性添加到Python CallScreen基类中,并创建一个animation_blur_value方法,以对模糊效果的值进行动画处理。
callscreen.py:
from kivy.properties import NumericProperty
[...]


class CallScreen(MDScreen):
    #     EffectWidget.
    blur_value = NumericProperty(0)

    [...]

    def animation_blur_value(self):
        if not self.open_call_box:
            Animation(blur_value=15, d=0.6, t="in_out_quad").start(self)
        else:
            Animation(blur_value=0, d=0.6, t="in_out_quad").start(self)
结果:

请注意,动画方法将异步执行!让我们为绿色的通话按钮设置动画,使其不会打扰我们的眼睛。
callscreen.py:
from kivy.utils import get_color_from_hex
from kivy.core.window import Window

from kivymd.color_definitions import colors

[...]


class CallScreen(MDScreen):
    [...]

    def animation_call_button(self, call_button):
        if not self.open_call_box:
            Animation(
                x=self.center_x - call_button.width / 2,
                y=dp(40),
                md_bg_color=get_color_from_hex(colors["Red"]["A700"]),
                d=0.6,
                t="in_out_quad",
            ).start(call_button)
        else:
            Animation(
                y=Window.height * 45 / 100 + call_button.height / 2,
                x=self.width - call_button.width - dp(20),
                md_bg_color=get_color_from_hex(colors["Green"]["A700"]),
                d=0.6,
                t="in_out_quad",
            ).start(call_button)
callscreen.kv:
[...]

<CallScreen>

    EffectWidget:
        [...]

        FitImage:
            [...]

    MDFloatingActionButton:
        [...]
        on_release:
            #     .
            root.animation_call_button(self); \
            [...]

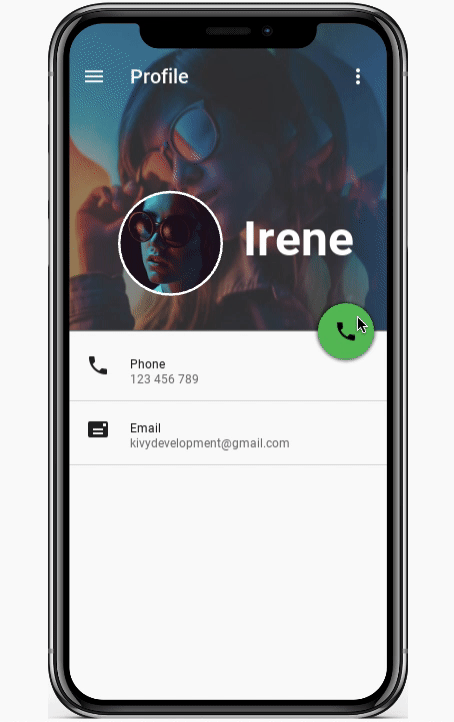
让我们将两个类型为TwoLineAvatarListItem的项目添加到主屏幕。
callscreen.kv:
#:import STANDARD_INCREMENT kivymd.material_resources.STANDARD_INCREMENT
#:import IconLeftWidget kivymd.uix.list.IconLeftWidget

[...]


<ItemList@TwoLineAvatarListItem>
    icon: ""
    font_style: "Caption"
    secondary_font_style: "Caption"
    height: STANDARD_INCREMENT

    IconLeftWidget:
        icon: root.icon


<CallScreen>

    EffectWidget:
        [...]

        FitImage:
            [...]

    MDBoxLayout:
        id: list_box
        orientation: "vertical"
        adaptive_height: True
        y: root.height * 45 / 100 - self.height / 2

        ItemList:
            icon: "phone"
            text: "Phone"
            secondary_text: "123 456 789"

        ItemList:
            icon: "mail"
            text: "Email"
            secondary_text: "kivydevelopment@gmail.com"

    MDFloatingActionButton:
        [...]
        on_release:
            root.animation_list_box(list_box); \
            [...]
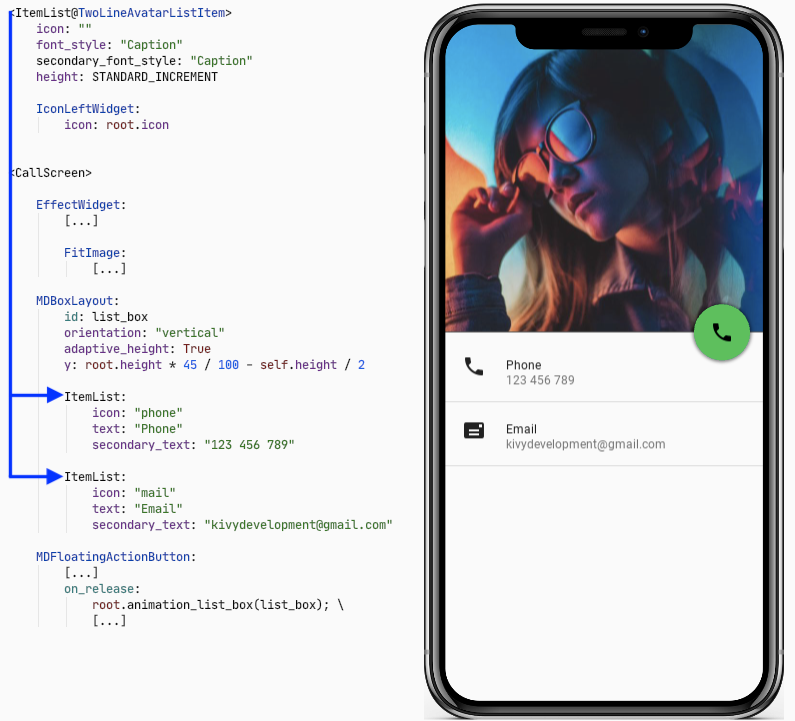
我们创建了两个ItemList项,并将它们放置在垂直框中。我们可以在CallScreen类中创建一个新方法animation_list_box来对此框进行动画处理。callscreen.py:
[...]


class CallScreen(MDScreen):
    [...]

    def animation_list_box(self, list_box):
        if not self.open_call_box:
            Animation(
                y=-list_box.y,
                opacity=0,
                d=0.6,
                t="in_out_quad"
            ).start(list_box)
        else:
            Animation(
                y=self.height * 45 / 100 - list_box.height / 2,
                opacity=1,
                d=0.6,
                t="in_out_quad",
            ).start(list_box)

让我们在屏幕上添加一个工具栏。
callscreen.kv:
[...]

<CallScreen>

    EffectWidget:
        [...]

        FitImage:
            [...]

    MDToolbar:
        y: root.height - self.height - dp(20)
        md_bg_color: 0, 0, 0, 0
        opposite_colors: True
        title: "Profile"
        left_action_items:  [["menu", lambda x: x]]
        right_action_items: [["dots-vertical", lambda x: x]]

    MDBoxLayout:
        [...]

        ItemList:
            [...]

        ItemList:
            [...]

    MDFloatingActionButton:
        [...]

头像和用户名。
callscreen.kv:
[...]

<CallScreen>

    EffectWidget:
        [...]

        FitImage:
            [...]

    MDToolbar:
        [...]

    MDFloatLayout:
        id: round_avatar
        size_hint: None, None
        size: "105dp", "105dp"
        md_bg_color: 1, 1, 1, 1
        radius: [self.height / 2,]
        y: root.height * 45 / 100 + self.height
        x: root.center_x - (self.width + user_name.width + dp(20)) / 2

        FitImage:
            size_hint: None, None
            size: "100dp", "100dp"
            mipmap: True
            source: "data/images/round-avatar.jpg"
            radius: [self.height / 2,]
            pos_hint: {"center_x": .5, "center_y": .5}
            mipmap: True

    MDLabel:
        id: user_name
        text: "Irene"
        font_style: "H3"
        bold: True
        size_hint: None, None
        -text_size: None, None
        size: self.texture_size
        theme_text_color: "Custom"
        text_color: 1, 1, 1, 1
        y: round_avatar.y + self.height / 2
        x: round_avatar.x + round_avatar.width + dp(20)

    MDBoxLayout:
        [...]

        ItemList:
            [...]

        ItemList:
            [...]

    MDFloatingActionButton:
        root.animation_round_avatar(round_avatar, user_name); \
        root.animation_user_name(round_avatar, user_name); \
        [...]

化身和用户名 的X和Y位置的典型动画。
callscreen.py:
[...]


class CallScreen(MDScreen):
    [...]

    def animation_round_avatar(self, round_avatar, user_name):
        if not self.open_call_box:
            Animation(
                x=self.center_x - round_avatar.width / 2,
                y=round_avatar.y + dp(50),
                d=0.6,
                t="in_out_quad",
            ).start(round_avatar)
        else:
            Animation(
                x=self.center_x - (round_avatar.width + user_name.width + dp(20)) / 2,
                y=self.height * 45 / 100 + round_avatar.height,
                d=0.6,
                t="in_out_quad",
            ).start(round_avatar)

    def animation_user_name(self, round_avatar, user_name):
        if not self.open_call_box:
            Animation(
                x=self.center_x - user_name.width / 2,
                y=user_name.y - STANDARD_INCREMENT,
                d=0.6,
                t="in_out_quad",
            ).start(self.ids.user_name)
        else:
            Animation(
                x=round_avatar.x + STANDARD_INCREMENT,
                y=round_avatar.center_y - user_name.height - dp(20),
                d=0.6,
                t="in_out_quad",
            ).start(user_name)

我们只需要创建一个带有按钮的框:

在撰写本文时,我发现在KivyMD库中找不到所需的按钮。我必须自己快点做。我只是向现有的MDIconButton类添加了画布指令,在按钮周围定义了一个圆圈,并将其与标签一起放置在垂直框中。
callscreen.kv:
<CallBoxButton@MDBoxLayout>
    orientation: "vertical"
    adaptive_size: True
    spacing: "8dp"
    icon: ""
    text: ""

    MDIconButton:
        icon: root.icon
        theme_text_color: "Custom"
        text_color: 1, 1, 1, 1

        canvas:
            Color:
                rgba: 1, 1, 1, 1
            Line:
                width: 1
                circle:
                    (\
                    self.center_x, \
                    self.center_y, \
                    min(self.width, self.height) / 2, \
                    0, \
                    360, \
                    )

    MDLabel:
        text: root.text
        size_hint_y: None
        height: self.texture_size[1]
        font_style: "Caption"
        halign: "center"
        theme_text_color: "Custom"
        text_color: 1, 1, 1, 1

[...]

接下来,我们创建一个框来容纳自定义按钮。
callscreen.kv:
<CallBox@MDGridLayout>
    cols: 3
    rows: 2
    adaptive_size: True
    spacing: "24dp"

    CallBoxButton:
        icon: "microphone-off"
        text: "Mute"
    CallBoxButton:
        icon: "volume-high"
        text: "Speaker"
    CallBoxButton:
        icon: "dialpad"
        text: "Keypad"

    CallBoxButton:
        icon: "plus-circle"
        text: "Add call"
    CallBoxButton:
        icon: "call-missed"
        text: "Transfer"
    CallBoxButton:
        icon: "account"
        text: "Contact"

[...]

现在,我们将创建的CallBox放置在CallScreen规则中,并设置其在Y轴上超出屏幕底部边框的位置。
callscreen.kv:
[...]

<CallScreen>

    EffectWidget:
        [...]

        FitImage:
            [...]

    MDToolbar:
        [...]

    MDFloatLayout:
        [...]

        FitImage:
            [...]

    MDLabel:
        [...]

    MDBoxLayout:
        [...]

        ItemList:
            [...]

        ItemList:
            [...]

    MDFloatingActionButton:
        root.animation_call_box(call_box, user_name); \
        [...]

    CallBox:
        id: call_box
        pos_hint: {"center_x": .5}
        y: -self.height
        opacity: 0
剩下的只是用按钮来动画创建的盒子的位置。
callscreen.py:
from kivy.metrics import dp
[...]


class CallScreen(MDScreen):
    [...]

    def animation_call_box(self, call_box, user_name):
        if not self.open_call_box:
            Animation(
                y=user_name.y - call_box.height - dp(100),
                opacity=1,
                d=0.6,
                t="in_out_quad",
            ).start(call_box)
        else:
            Animation(
                y=-call_box.height,
                opacity=0,
                d=0.6,
                t="in_out_quad",
            ).start(call_box)
最终GIF,并在移动设备上进行了测试:

就这样,我希望它有用!