哈Ha!我将在Python的OpenCV库上开始一系列文章。谁在乎,欢迎下切!
介绍
OpenCV是用于图像分析,分类和处理的开源计算机视觉库。它被广泛用于C,C ++,Python和Java之类的语言中。
安装
我们假设Python和OpenCV库已经安装,如果没有,那么这里有上安装Python的指示窗口和Ubuntu的,上安装OpenCV的窗口和Ubuntu的。
, . . — . , , ( 0, 0 ) . , , 400x300 . , 400 300 . 400*300 = 120000 .
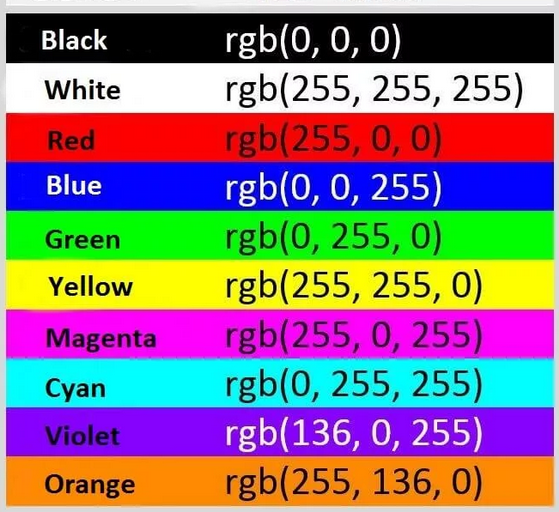
: RGB. 0 255, 0 , 255 . 0 255 , 0 , 255 :

RGB(red, green, blue — , , ), , . 0 255 , «» . , [0,255], , , 8- . (, , ). , , 255: (255, 255, 255). , , 0: (0, 0, 0). , RGB :
OpenCV
. , — . , — :
import cv2:
from cv2 import cv2,
def loading_displaying_saving():
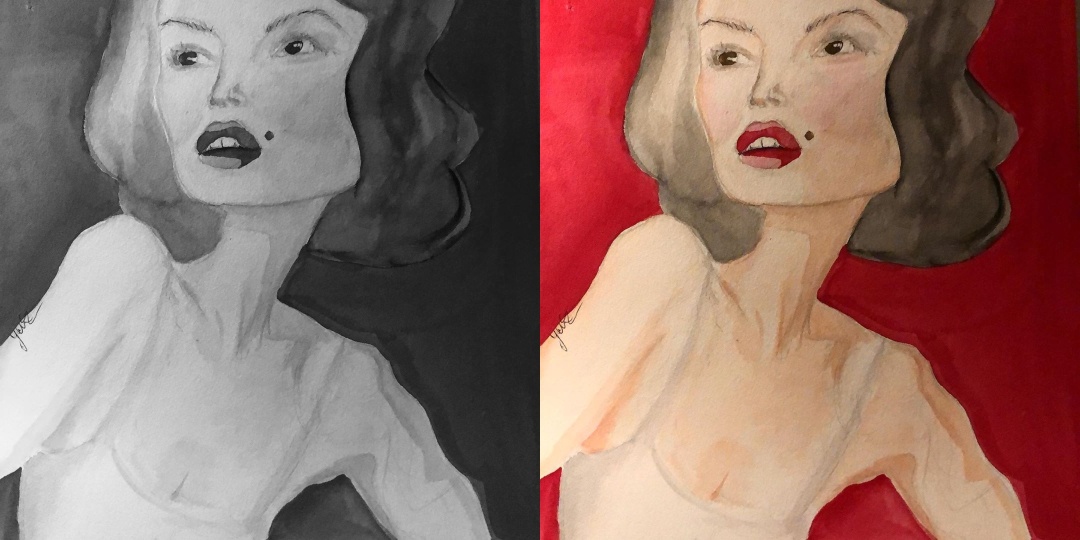
img = cv2.imread('girl.jpg', cv2.IMREAD_GRAYSCALE)
cv2.imshow('girl', img)
cv2.waitKey(0)
cv2.imwrite('graygirl.jpg', img)cv2.imread(), , , , , . RGB — cv2.IMREAD_COLOR, — cv2.IMREAD_GRAYSCALE. cv2.IMREAD_COLOR. 2D ( ) 3D ( ) NumPy. : x x 3, 3 — , . : x .
cv2.imshow() . , , , , cv2.waitKey(), . , . , 0. , RGB:
, , cv2.imwrite() jpg( :png, tiff,jpeg,bmp . ., ), , , .
, , shape:
print(":"+str(img.shape[0]))
print(":" + str(img.shape[1]))
print(" :" + str(img.shape[2]))
, img.shape[2] , 2D .
, x y , . , OpenCV RGB , , , OpenCV , :
(b, g, r) = img[0, 0]
print(": {}, : {}, : {}".format(r, g, b))
C , (0,0). , , . , b, g r. . , , :
img[0, 0] = (255, 0, 0)
(b, g, r) = img[0, 0]
 print(": {}, : {}, : {}".format(r, g, b))
在第一行中,我们将像素值(0,0)设置为(255,0,0),然后再次获取该像素值并将其显示在屏幕上,结果在控制台上显示了以下内容:
: 251, : 43, : 65
: 0, : 0, : 255这是第一部分的结尾。如果突然有人需要源代码和图片,那么这里是github的链接。谢谢大家的关注!