在本教程中,我们将研究Web密码API:客户端数据加密接口。本教程基于本文。假定您对加密有些熟悉。
我们到底要做什么?我们将编写一个简单的服务器,该服务器将接受来自客户端的加密数据并按要求返回。数据本身将在客户端进行处理。
该服务器将使用JavaScript的Express客户端在Node.js中实现。Bootstrap将用于样式设置。
项目代码在这里。
如果您有兴趣,请关注我。
训练
创建目录
crypto-tut:
mkdir crypto-tut
我们进入它并初始化项目:
cd crypto-tut

npm init -y
安装
express:
npm i express
安装
nodemon:
npm i -D nodemon
编辑
package.json:
"main": "server.js",
"scripts": {
    "start": "nodemon"
},
项目结构:
crypto-tut
    --node_modules
    --src
        --client.js
        --index.html
        --style.css
    --package-lock.json
    --package.json
    --server.js
内容
index.html:
<head>
    <!-- Bootstrap CSS -->
    <link rel="stylesheet" href="https://stackpath.bootstrapcdn.com/bootstrap/4.5.2/css/bootstrap.min.css" integrity="sha384-JcKb8q3iqJ61gNV9KGb8thSsNjpSL0n8PARn9HuZOnIxN0hoP+VmmDGMN5t9UJ0Z" crossorigin="anonymous">
    <link rel="stylesheet" href="style.css">
    <script src="client.js" defer></source>
</head>

<body>
    <div class="container">
        <h3>Web Cryptography API Tutorial</h3>
        <input type="text" value="Hello, World!" class="form-control">
        <div class="btn-box">
            <button class="btn btn-primary btn-send">Send message</button>
            <button class="btn btn-success btn-get" disabled>Get message</button>
        </div>
        <output></output>
    </div>
</body>
内容
style.css:
h3,
.btn-box {
    margin: .5em;
    text-align: center;
}

input,
output {
    display: block;
    margin: 1em auto;
    text-align: center;
}

output span {
    color: green;
}
服务器
让我们开始创建服务器。
我们打开
server.js。
我们连接快递并创建应用程序和路由器的实例:
const express = require('express')
const app = express()
const router = express.Router()
我们连接中间件(请求和响应之间的中间层):
//
app.use(express.json({
    type: ['application/json', 'text/plain']
}))
//
app.use(router)
//
app.use(express.static('src'))
我们创建一个变量来存储数据:
let data
我们处理来自客户端的数据接收:
router.post('/secure-api', (req, res) => {
    //
    data = req.body
    //
    console.log(data)
    //
    res.end()
})
我们处理向客户端的数据发送:
router.get('/secure-api', (req, res) => {
    //     JSON,
    //
    res.json(data)
})
我们启动服务器:
app.listen(3000, () => console.log('Server ready'))
我们执行命令
npm start。终端显示消息“服务器就绪”。开幕http://localhost:3000:
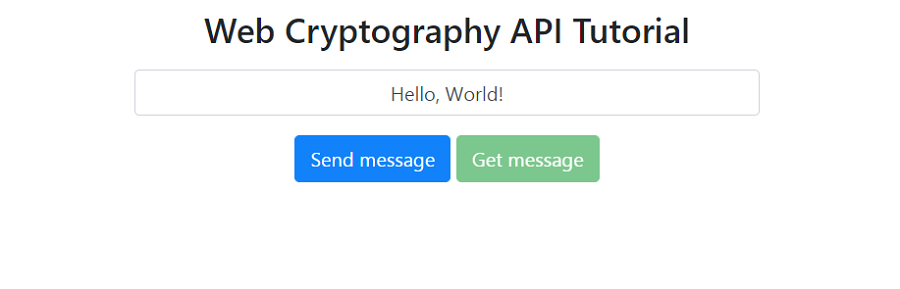
这是我们完成服务器工作的地方,请转到应用程序的客户端。
客户
这就是乐趣的开始。
打开文件
client.js。
AES-GCM对称算法将用于数据加密。这样的算法允许使用相同的密钥进行加密和解密。
创建对称密钥生成函数:
// https://developer.mozilla.org/en-US/docs/Web/API/SubtleCrypto/generateKey
const generateKey = async () =>
    window.crypto.subtle.generateKey({
        name: 'AES-GCM',
        length: 256,
    }, true, ['encrypt', 'decrypt'])
加密之前,必须将数据编码为字节流。这可以通过TextEncoder类轻松完成:
// https://developer.mozilla.org/en-US/docs/Web/API/TextEncoder
const encode = data => {
    const encoder = new TextEncoder()

    return encoder.encode(data)
}
接下来,我们需要一个执行向量(初始化向量,IV),它是一个随机或伪随机字符序列,被添加到加密密钥中以提高其安全性:
// https://developer.mozilla.org/en-US/docs/Web/API/Crypto/getRandomValues
const generateIv = () =>
    // https://developer.mozilla.org/en-US/docs/Web/API/AesGcmParams
    window.crypto.getRandomValues(new Uint8Array(12))
创建辅助函数后,我们可以实现加密功能。此函数必须返回一个密码和一个IV,以便随后可以对密码进行解码:
const encrypt = async (data, key) => {
    const encoded = encode(data)
    const iv = generateIv()
    const cipher = await window.crypto.subtle.encrypt({
        name: 'AES-GCM',
        iv
    }, key, encoded)

    return {
            cipher,
            iv
        }
}
用SubtleCrypto加密数据后,它们是原始二进制数据的缓冲区。这不是传输和存储的最佳格式。让我们解决这个问题。
数据通常以JSON格式发送并存储在数据库中。因此,将数据打包为可移植格式是有意义的。一种方法是将数据转换为base64字符串:
// https://developers.google.com/web/updates/2012/06/How-to-convert-ArrayBuffer-to-and-from-String
const pack = buffer => window.btoa(
    String.fromCharCode.apply(null, new Uint8Array(buffer))
)
接收到数据后,您需要执行相反的过程,即 将base64编码的字符串转换为原始二进制缓冲区:
// https://developers.google.com/web/updates/2012/06/How-to-convert-ArrayBuffer-to-and-from-String
const unpack = packed => {
    const string = window.atob(packed)
    const buffer = new ArrayBuffer(string.length)
    const bufferView = new Uint8Array(buffer)

    for (let i = 0; i < string.length; i++) {
        bufferView[i] = string.charCodeAt(i)
    }

    return buffer
}
仍然需要解密获得的数据。但是,解密后,我们需要将字节流解码为其原始格式。可以使用TextDecoder类完成此操作:
// https://developer.mozilla.org/en-US/docs/Web/API/TextDecoder
const decode = byteStream => {
    const decoder = new TextDecoder()

    return decoder.decode(byteStream)
}
解密功能与加密功能相反:
// https://developer.mozilla.org/en-US/docs/Web/API/SubtleCrypto/decrypt
const decrypt = async (cipher, key, iv) => {
    const encoded = await window.crypto.subtle.decrypt({
        name: 'AES-GCM',
        iv
    }, key, cipher)

    return decode(encoded)
}
在此阶段,内容
client.js如下所示:
const generateKey = async () =>
    window.crypto.subtle.generateKey({
        name: 'AES-GCM',
        length: 256,
    }, true, ['encrypt', 'decrypt'])

const encode = data => {
    const encoder = new TextEncoder()

    return encoder.encode(data)
}

const generateIv = () =>
    window.crypto.getRandomValues(new Uint8Array(12))

const encrypt = async (data, key) => {
    const encoded = encode(data)
    const iv = generateIv()
    const cipher = await window.crypto.subtle.encrypt({
        name: 'AES-GCM',
        iv
    }, key, encoded)

    return {
        cipher,
        iv
    }
}

const pack = buffer => window.btoa(
    String.fromCharCode.apply(null, new Uint8Array(buffer))
)

const unpack = packed => {
    const string = window.atob(packed)
    const buffer = new ArrayBuffer(string.length)
    const bufferView = new Uint8Array(buffer)

    for (let i = 0; i < string.length; i++) {
        bufferView[i] = string.charCodeAt(i)
    }

    return buffer
}

const decode = byteStream => {
    const decoder = new TextDecoder()

    return decoder.decode(byteStream)
}

const decrypt = async (cipher, key, iv) => {
    const encoded = await window.crypto.subtle.decrypt({
        name: 'AES-GCM',
        iv
    }, key, cipher)

    return decode(encoded)
}
现在,让我们实现发送和接收数据。
我们创建变量:
//    ,
const input = document.querySelector('input')
//
const output = document.querySelector('output')

//
let key
数据加密和发送:
const encryptAndSendMsg = async () => {
    const msg = input.value

     //
    key = await generateKey()

    const {
        cipher,
        iv
    } = await encrypt(msg, key)

    //
    await fetch('http://localhost:3000/secure-api', {
        method: 'POST',
        body: JSON.stringify({
            cipher: pack(cipher),
            iv: pack(iv)
        })
    })

    output.innerHTML = ` <span>"${msg}"</span> .<br>   .`
}
接收和解密数据:
const getAndDecryptMsg = async () => {
    const res = await fetch('http://localhost:3000/secure-api')

    const data = await res.json()

    //
    console.log(data)

    //
    const msg = await decrypt(unpack(data.cipher), key, unpack(data.iv))

    output.innerHTML = `   .<br> <span>"${msg}"</span> .`
}
处理按钮的点击次数:
document.querySelector('.btn-box').addEventListener('click', e => {
    if (e.target.classList.contains('btn-send')) {
        encryptAndSendMsg()

        e.target.nextElementSibling.removeAttribute('disabled')
    } else if (e.target.classList.contains('btn-get')) {
        getAndDecryptMsg()
    }
})
重新启动服务器,以防万一。我们打开
http://localhost:3000。单击“发送消息”按钮:
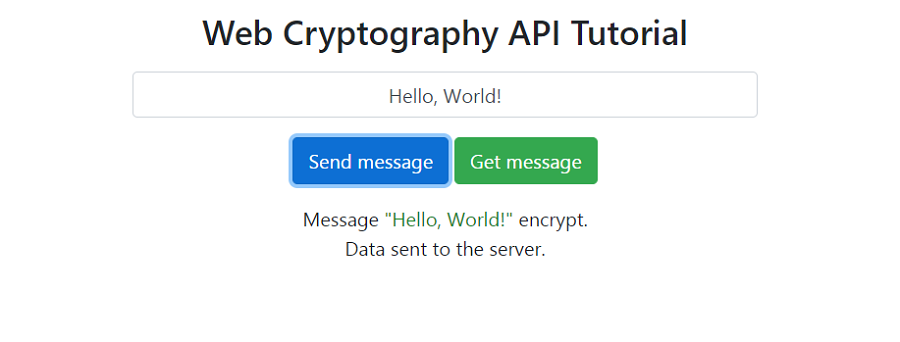
我们在终端中看到服务器接收的数据:
{
  cipher: 'j8XqWlLIrFxyfA2easXkJTLLIt9x8zLHei/tTKI=',
  iv: 'F8doVULJzbEQs3M1'
}
单击“获取消息”按钮:
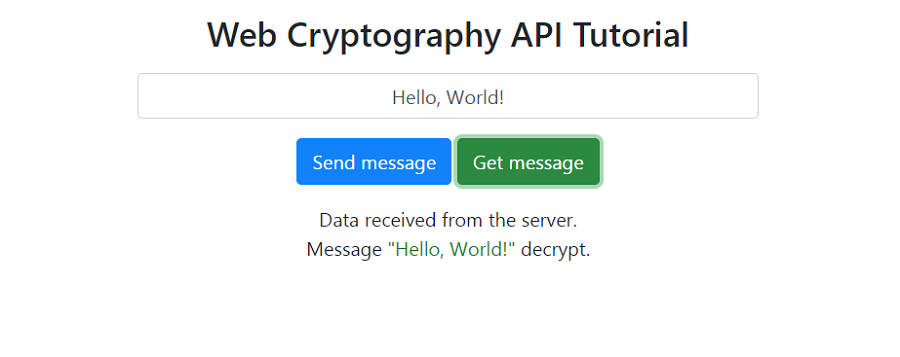
我们在控制台中看到客户端收到的相同数据:
{
  cipher: 'j8XqWlLIrFxyfA2easXkJTLLIt9x8zLHei/tTKI=',
  iv: 'F8doVULJzbEQs3M1'
}
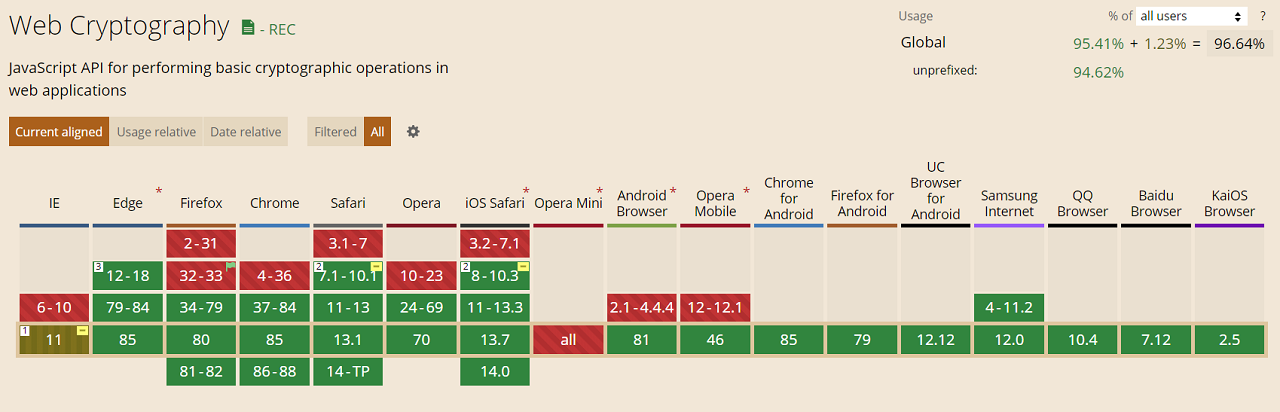
Web密码学API为我们提供了有趣的机会,可以保护客户端的机密信息。迈向无服务器Web开发的又一步。
目前对该技术的支持率为96%:
希望您喜欢这篇文章。感谢您的关注。