
进行项目更改时,静态代码分析显示出最高的效率,因为在将来错误修复总是比在早期阶段预防更难。我们将继续在连续开发系统中扩展使用PVS-Studio的选项,并以Minetest游戏为例,展示如何使用Microsoft Azure DevOps中的自托管代理设置拉取请求的分析。
简要介绍我们正在处理的内容
Minetest是一个开源的跨平台游戏引擎,包含约200,000行C,C ++和Lua代码。它允许您在体素空间中创建不同的游戏模式。支持多人游戏,以及许多社区模组。项目存储库托管在这里:https : //github.com/minetest/minetest。
使用以下工具来设置常规错误搜索:
PVS-Studio是C,C ++,C#和Java中的静态代码分析器,用于查找错误和安全缺陷。
Azure DevOps是基于云的平台,提供了在远程服务器上开发,运行应用程序和存储数据的功能。
您可以使用Windows和Linux虚拟机在Azure中执行开发任务。但是,在本地硬件上运行代理具有几个重要的优点:
- Localhost可能比Azure VM具有更多的资源;
- 代理在完成任务后不会“消失”;
- 直接定制环境的能力,以及对构建过程的更灵活控制;
- 在本地存储中间文件对构建速度有积极的影响。
- 您每月可以免费完成30多个任务。
准备使用自托管代理
在“ PVS-Studio进入云:Azure DevOps ”一文中详细介绍了Azure的入门过程,因此,我将直接创建一个自托管代理。
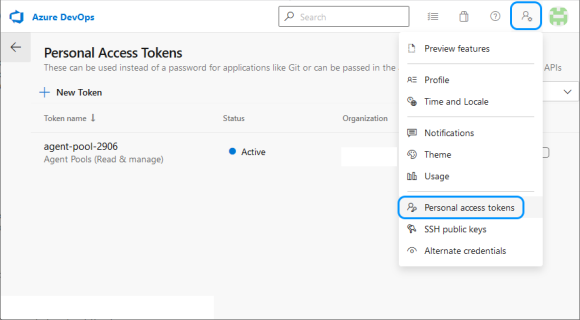
为了使代理有权连接到项目池,他们需要特殊的访问令牌。您可以在“用户设置”菜单的“个人访问令牌”页面上获得它。
单击“新令牌”后,您需要指定一个名称并选择“读取和管理代理程序池”(您可能需要通过“显示所有范围”来展开完整列表)。
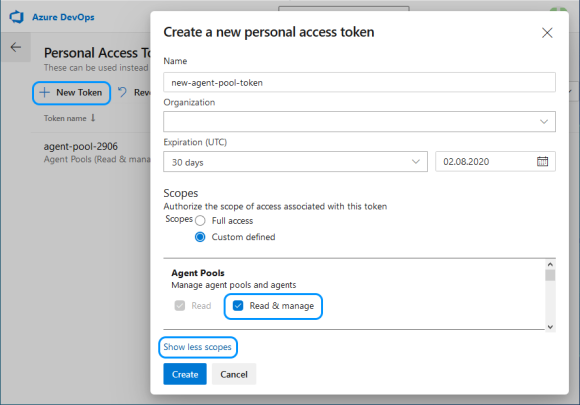
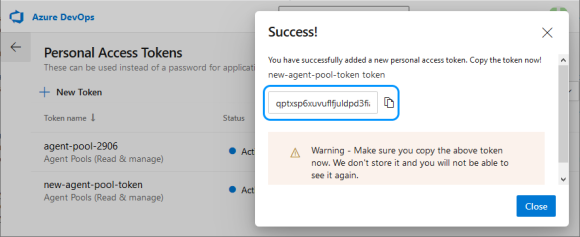
您需要复制令牌,因为Azure不会再次显示它,而您将必须创建一个新令牌。
基于Windows Server Core的Docker容器将用作代理。主机是我在装有Hyper-V的Windows 10 x64上的工作计算机。
首先,您需要扩展可用于Docker容器的磁盘空间量。
在Windows上,为此,您需要修改文件'C:\ ProgramData \ Docker \ config \ daemon.json',如下所示:
{
  "registry-mirrors": [],
  "insecure-registries": [],
  "debug": true,
  "experimental": false,
  "data-root": "d:\\docker",
  "storage-opts": [ "size=40G" ]
}
要为具有构建系统和所有所需内容的代理创建Docker映像,请在“ D:\ docker-agent”目录中添加包含以下内容的Docker文件:
# escape=`

FROM mcr.microsoft.com/dotnet/framework/runtime

SHELL ["cmd", "/S", "/C"]

ADD https://aka.ms/vs/16/release/vs_buildtools.exe C:\vs_buildtools.exe
RUN C:\vs_buildtools.exe --quiet --wait --norestart --nocache `
  --installPath C:\BuildTools `
  --add Microsoft.VisualStudio.Workload.VCTools `
  --includeRecommended

RUN powershell.exe -Command `
  Set-ExecutionPolicy Bypass -Scope Process -Force; `
  [System.Net.ServicePointManager]::SecurityProtocol =
    [System.Net.ServicePointManager]::SecurityProtocol -bor 3072; `
  iex ((New-Object System.Net.WebClient)
    .DownloadString('https://chocolatey.org/install.ps1')); `
  choco feature enable -n=useRememberedArgumentsForUpgrades;

RUN powershell.exe -Command `
  choco install -y cmake --installargs '"ADD_CMAKE_TO_PATH=System"'; `
  choco install -y git --params '"/GitOnlyOnPath /NoShellIntegration"'

RUN powershell.exe -Command `
  git clone https://github.com/microsoft/vcpkg.git; `
  .\vcpkg\bootstrap-vcpkg -disableMetrics; `
  $env:Path += '";C:\vcpkg"'; `
  [Environment]::SetEnvironmentVariable(
    '"Path"', $env:Path, [System.EnvironmentVariableTarget]::Machine); `
  [Environment]::SetEnvironmentVariable(
    '"VCPKG_DEFAULT_TRIPLET"', '"x64-windows"',
  [System.EnvironmentVariableTarget]::Machine)

RUN powershell.exe -Command `
  choco install -y pvs-studio; `
  $env:Path += '";C:\Program Files (x86)\PVS-Studio"'; `
  [Environment]::SetEnvironmentVariable(
    '"Path"', $env:Path, [System.EnvironmentVariableTarget]::Machine)

RUN powershell.exe -Command `
  $latest_agent =
    Invoke-RestMethod -Uri "https://api.github.com/repos/Microsoft/
                          azure-pipelines-agent/releases/latest"; `
  $latest_agent_version =
    $latest_agent.name.Substring(1, $latest_agent.tag_name.Length-1); `
  $latest_agent_url =
    '"https://vstsagentpackage.azureedge.net/agent/"' + $latest_agent_version +
  '"/vsts-agent-win-x64-"' + $latest_agent_version + '".zip"'; `
  Invoke-WebRequest -Uri $latest_agent_url -Method Get -OutFile ./agent.zip; `
  Expand-Archive -Path ./agent.zip -DestinationPath ./agent

USER ContainerAdministrator
RUN reg add hklm\system\currentcontrolset\services\cexecsvc
        /v ProcessShutdownTimeoutSeconds /t REG_DWORD /d 60
RUN reg add hklm\system\currentcontrolset\control
        /v WaitToKillServiceTimeout /t REG_SZ /d 60000 /f

ADD .\entrypoint.ps1 C:\entrypoint.ps1
SHELL ["powershell", "-Command",
       "$ErrorActionPreference = 'Stop';
     $ProgressPreference = 'SilentlyContinue';"]
ENTRYPOINT .\entrypoint.ps1
结果将是基于MSBuild for C ++的构建系统,其中Chocolatey用于安装PVS-Studio,CMake和Git。为了方便管理项目所依赖的库,构建了Vcpkg。还将下载最新版本的Azure Pipelines代理。
要从ENTRYPOINT Docker文件初始化代理,将调用PowerShell脚本“ entrypoint.ps1”,您需要在其中添加项目“组织” URL,代理池令牌和PVS-Studio许可证参数:
$organization_url = "https://dev.azure.com/< Microsoft Azure>"
$agents_token = "<token >"
$pvs_studio_user = "< PVS-Studio>"
$pvs_studio_key = "< PVS-Studio>"
try
{
C:\BuildTools\VC\Auxiliary\Build\vcvars64.bat
PVS-Studio_Cmd credentials -u $pvs_studio_user -n $pvs_studio_key
.\agent\config.cmd --unattended `
--url $organization_url `
--auth PAT `
--token $agents_token `
--replace;
.\agent\run.cmd
}
finally
{
# Agent graceful shutdown
# https://github.com/moby/moby/issues/25982
.\agent\config.cmd remove --unattended `
--auth PAT `
--token $agents_token
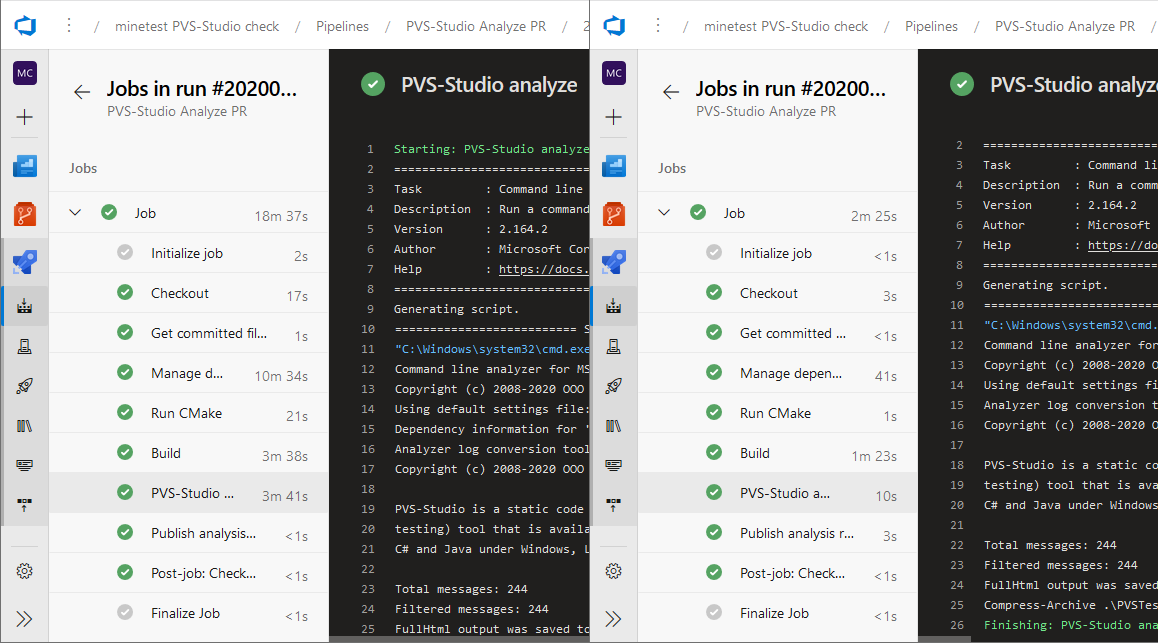
}用于构建映像和启动代理的命令:
docker build -t azure-agent -m 4GB .
docker run -id --name my-agent -m 4GB --cpu-count 4 azure-agent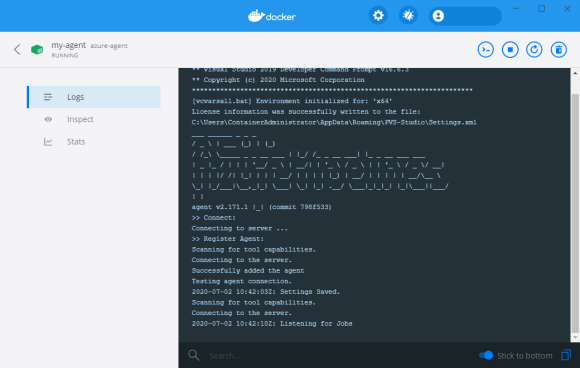
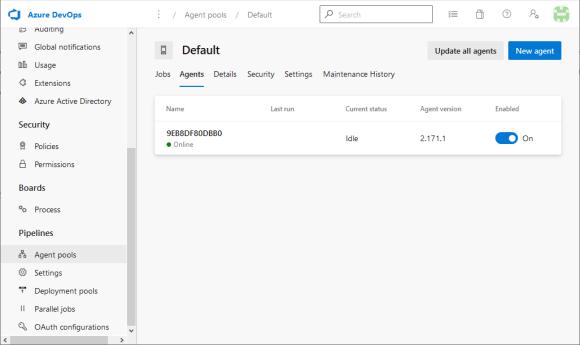
代理正在运行并准备执行任务。
在自托管代理上运行分析
为了进行PR分析,将使用以下脚本创建新管道:
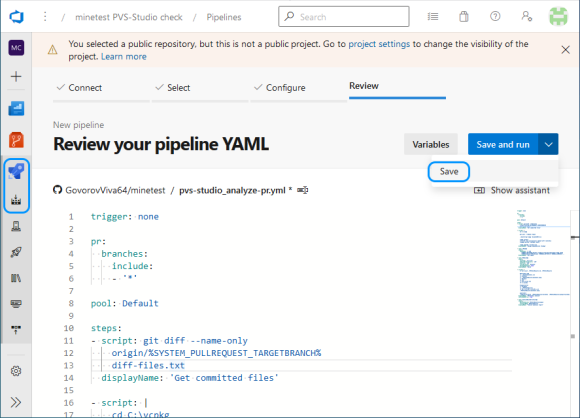
trigger: none
pr:
branches:
include:
- '*'
pool: Default
steps:
- script: git diff --name-only
origin/%SYSTEM_PULLREQUEST_TARGETBRANCH% >
diff-files.txt
displayName: 'Get committed files'
- script: |
cd C:\vcpkg
git pull --rebase origin
CMD /C ".\bootstrap-vcpkg -disableMetrics"
vcpkg install ^
irrlicht zlib curl[winssl] openal-soft libvorbis ^
libogg sqlite3 freetype luajit
vcpkg upgrade --no-dry-run
displayName: 'Manage dependencies (Vcpkg)'
- task: CMake@1
inputs:
cmakeArgs: -A x64
-DCMAKE_TOOLCHAIN_FILE=C:/vcpkg/scripts/buildsystems/vcpkg.cmake
-DCMAKE_BUILD_TYPE=Release -DENABLE_GETTEXT=0 -DENABLE_CURSES=0 ..
displayName: 'Run CMake'
- task: MSBuild@1
inputs:
solution: '**/*.sln'
msbuildArchitecture: 'x64'
platform: 'x64'
configuration: 'Release'
maximumCpuCount: true
displayName: 'Build'
- script: |
IF EXIST .\PVSTestResults RMDIR /Q/S .\PVSTestResults
md .\PVSTestResults
PVS-Studio_Cmd ^
-t .\build\minetest.sln ^
-S minetest ^
-o .\PVSTestResults\minetest.plog ^
-c Release ^
-p x64 ^
-f diff-files.txt ^
-D C:\caches
PlogConverter ^
-t FullHtml ^
-o .\PVSTestResults\ ^
-a GA:1,2,3;64:1,2,3;OP:1,2,3 ^
.\PVSTestResults\minetest.plog
IF NOT EXIST "$(Build.ArtifactStagingDirectory)" ^
MKDIR "$(Build.ArtifactStagingDirectory)"
powershell -Command ^
"Compress-Archive -Force ^
'.\PVSTestResults\fullhtml' ^
'$(Build.ArtifactStagingDirectory)\fullhtml.zip'"
displayName: 'PVS-Studio analyze'
continueOnError: true
- task: PublishBuildArtifacts@1
inputs:
PathtoPublish: '$(Build.ArtifactStagingDirectory)'
ArtifactName: 'psv-studio-analisys'
publishLocation: 'Container'
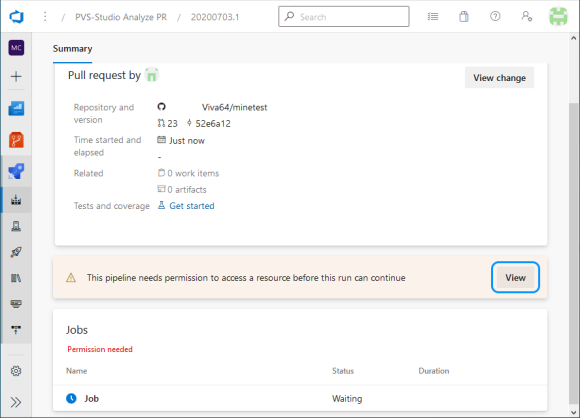
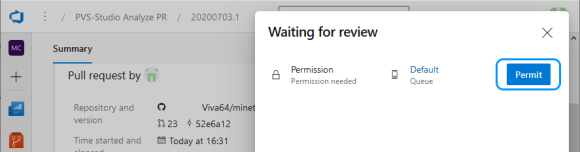
displayName: 'Publish analysis report'该脚本将在收到PR时触发,并将在分配给默认池的代理上执行。您只需要授予他使用此池的权限。
该脚本保存使用git diff获得的已更改文件的列表。然后更新依赖关系,通过CMake生成项目解决方案,并进行构建。
如果构建成功,则将开始分析更改的文件(标志'-f diff-files.txt'),而忽略CMake创建的辅助项目(仅选择带有'-S minetest'标志的所需项目)。为了加快对头文件和C ++源文件之间的链接的搜索,创建了一个特殊的缓存,该缓存将存储在单独的目录中(标志“ -DC:\ caches”)。
因此,我们现在可以接收有关项目变更分析的报告。
就像在文章开头所说的那样,由于中间文件的本地存储,使用自托管代理的令人愉快的收获是任务执行的明显加速。
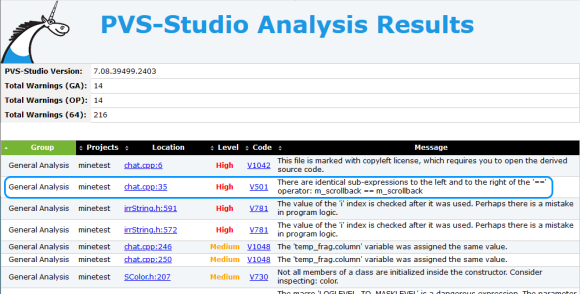
Minetest中发现的一些错误
覆盖结果
V519为'color_name'变量连续分配了两次值。也许这是一个错误。检查行:621,627。string.cpp 627
static bool parseNamedColorString(const std::string &value,
                                  video::SColor &color)
{
  std::string color_name;
  std::string alpha_string;

  size_t alpha_pos = value.find('#');
  if (alpha_pos != std::string::npos) {
    color_name = value.substr(0, alpha_pos);
    alpha_string = value.substr(alpha_pos + 1);
  } else {
    color_name = value;
  }

  color_name = lowercase(value); // <=

  std::map<const std::string, unsigned>::const_iterator it;
  it = named_colors.colors.find(color_name);
  if (it == named_colors.colors.end())
    return false;
  ....
}此函数应使用透明度参数(例如Green#77)解析颜色名称并返回其代码。根据检查条件的结果,行拆分的结果或函数参数的副本将传递给color_name变量。但是,不是将结果字符串本身转换为小写字母,而是原始参数。结果,如果存在透明度参数,则无法在颜色字典中找到它。我们可以这样修改此行:
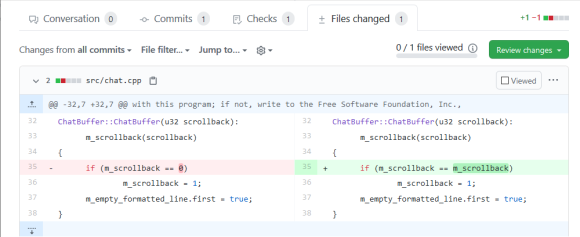
color_name = lowercase(color_name);不必要的条件检查V547表达式'nearest_emergefull_d == -1'始终为true。clientiface.cpp 363
void RemoteClient::GetNextBlocks (....)
{
  ....
  s32 nearest_emergefull_d = -1;
  ....
  s16 d;
  for (d = d_start; d <= d_max; d++) {
    ....
      if (block == NULL || surely_not_found_on_disk || block_is_invalid) {
        if (emerge->enqueueBlockEmerge(peer_id, p, generate)) {
          if (nearest_emerged_d == -1)
            nearest_emerged_d = d;
        } else {
          if (nearest_emergefull_d == -1) // <=
            nearest_emergefull_d = d;
          goto queue_full_break;
        }
  ....
  }
  ....
queue_full_break:
  if (nearest_emerged_d != -1) { // <=
    new_nearest_unsent_d = nearest_emerged_d;
  } else ....
}最近值_emergefull_d变量在循环操作期间不会更改,并且其检查不会影响算法的执行。这要么是复制粘贴不正确的结果,要么是他们忘记对此进行一些计算。
V560条件表达式的一部分始终为false:y> max_spawn_y。mapgen_v7.cpp 262
int MapgenV7::getSpawnLevelAtPoint(v2s16 p)
{
  ....
  while (iters > 0 && y <= max_spawn_y) {               // <=
    if (!getMountainTerrainAtPoint(p.X, y + 1, p.Y)) {
      if (y <= water_level || y > max_spawn_y)          // <=
        return MAX_MAP_GENERATION_LIMIT; // Unsuitable spawn point

      // y + 1 due to biome 'dust'
      return y + 1;
    }
  ....
}
在循环的下一次迭代之前检查 “ y ”变量的值。随后的相反比较将始终返回false,并且通常不影响条件测试的结果。
丢失了指针指针
m_client指针的V595的指针检查,它使用了IT之前针对nullptr进行了验证。检查行:183,187。game.cpp 183
void gotText(const StringMap &fields)
{
  ....
  if (m_formname == "MT_DEATH_SCREEN") {
    assert(m_client != 0);
    m_client->sendRespawn();
    return;
  }

  if (m_client && m_client->modsLoaded())
    m_client->getScript()->on_formspec_input(m_formname, fields);
}在访问m_client指针之前,使用assert宏检查它是否不为null 。但这仅适用于调试版本。这种预防措施在释放时会被替换为虚拟对象,并且存在取消引用空指针的风险。
有点还是没有?
V616在按位运算中使用值为0的'(FT_RENDER_MODE_NORMAL)'命名常量。 CGUITTFont.h 360
typedef enum  FT_Render_Mode_
{
  FT_RENDER_MODE_NORMAL = 0,
  FT_RENDER_MODE_LIGHT,
  FT_RENDER_MODE_MONO,
  FT_RENDER_MODE_LCD,
  FT_RENDER_MODE_LCD_V,

  FT_RENDER_MODE_MAX
} FT_Render_Mode;

#define FT_LOAD_TARGET_( x )   ( (FT_Int32)( (x) & 15 ) << 16 )
#define FT_LOAD_TARGET_NORMAL  FT_LOAD_TARGET_( FT_RENDER_MODE_NORMAL )

void update_load_flags()
{
  // Set up our loading flags.
  load_flags = FT_LOAD_DEFAULT | FT_LOAD_RENDER;
  if (!useHinting()) load_flags |= FT_LOAD_NO_HINTING;
  if (!useAutoHinting()) load_flags |= FT_LOAD_NO_AUTOHINT;
  if (useMonochrome()) load_flags |=
    FT_LOAD_MONOCHROME | FT_LOAD_TARGET_MONO | FT_RENDER_MODE_MONO;
  else load_flags |= FT_LOAD_TARGET_NORMAL; // <=
}
FT_LOAD_TARGET_NORMAL 宏扩展为零,并且按位“或”将不会在load_flags中设置任何标志,可以删除else分支。
舍入的整数除法
V636的“rect.getHeight()/ 16”表达隐式地从“INT”类型“浮动”型流延。考虑使用显式类型转换以避免丢失小数部分。例如:double A =(double)(X)/ Y;。 hud.cpp 771
void drawItemStack(....)
{
  float barheight = rect.getHeight() / 16;
  float barpad_x = rect.getWidth() / 16;
  float barpad_y = rect.getHeight() / 16;

  core::rect<s32> progressrect(
    rect.UpperLeftCorner.X + barpad_x,
    rect.LowerRightCorner.Y - barpad_y - barheight,
    rect.LowerRightCorner.X - barpad_x,
    rect.LowerRightCorner.Y - barpad_y);
}
Getters rect返回一个整数值。整数除法的结果写入浮点变量,小数部分丢失。这些计算中似乎有不匹配的数据类型。
可疑序列分支语句
V646考虑检查应用程序的逻辑。可能缺少“ else”关键字。 treegen.cpp 413
treegen::error make_ltree(...., TreeDef tree_definition)
{
  ....
  std::stack <core::matrix4> stack_orientation;
  ....
    if ((stack_orientation.empty() &&
      tree_definition.trunk_type == "double") ||
      (!stack_orientation.empty() &&
      tree_definition.trunk_type == "double" &&
      !tree_definition.thin_branches)) {
      ....
    } else if ((stack_orientation.empty() &&
      tree_definition.trunk_type == "crossed") ||
      (!stack_orientation.empty() &&
      tree_definition.trunk_type == "crossed" &&
      !tree_definition.thin_branches)) {
      ....
    } if (!stack_orientation.empty()) {                  // <=
  ....
  }
  ....
}这是树生成算法中的else-if序列。在中间,下一个if块与前一个else的右括号在同一行上。也许代码可以正常工作:在此之前,如果创建-a,则先创建主干块,然后再创建叶子;也许他们错过了其他。当然,这只能由开发人员说。
错误的内存分配检查
V668没有针对空测试'clouds'指针的意义,因为内存是使用'new'运算符分配的。如果内存分配错误,将生成异常。 game.cpp 1367
bool Game::createClient(....)
{
  if (m_cache_enable_clouds) {
    clouds = new Clouds(smgr, -1, time(0));
    if (!clouds) {
      *error_message = "Memory allocation error (clouds)";
      errorstream << *error_message << std::endl;
      return false;
    }
  }
}如果new无法创建对象,则将引发std :: bad_alloc异常,并且必须由try-catch块进行处理。而且检查这种形式是没有用的。
超出
范围读取数组V781使用'i'索引后,将对其进行检查。程序逻辑中可能有一个错误。irrString.h 572
bool equalsn(const string<T,TAlloc>& other, u32 n) const
{
  u32 i;
  for(i=0; array[i] && other[i] && i < n; ++i) // <=
    if (array[i] != other[i])
      return false;

  // if one (or both) of the strings was smaller then they
  // are only equal if they have the same length
  return (i == n) || (used == other.used);
}在检查索引之前,将访问数组元素,这可能导致错误。像这样重写循环可能是值得的:
for (i=0; i < n; ++i) // <=
  if (!array[i] || !other[i] || array[i] != other[i])
    return false;
其他错误
本文是有关分析Azure DevOps中的拉取请求的,并不旨在提供Minetest项目中错误的详细概述。这只是我发现有趣的一些代码片段。我们建议该项目的作者不要按照本文来纠正错误,并且对PVS-Studio将发出的警告进行更全面的分析。
结论
得益于命令行模式下的灵活配置,PVS-Studio分析可以嵌入到多种CI / CD方案中。正确使用可用资源可提高生产率。
应该注意的是,拉取请求检查模式仅在分析仪的企业版中可用。要获得演示企业许可证,请在下载页面上申请许可证时在注释中注明。有关许可证之间差异的更多详细信息,请参见PVS-Studio订购页面。

如果您想与讲英语的读者分享这篇文章,请使用翻译链接:Alexey Govorov。PVS-Studio:使用自托管代理分析Azure DevOps中的拉取请求。