作者的版本
Python版本:3.8.2
discord.py版本:1.3.3
问候,Khabrovites和其他互联网用户。今天,我将开始一系列有关使用discord.py库创建Discord机器人的文章。我们将研究使用模块创建原始bot和“高级” bot。在本文中,我们将创建一个标准命令和另一个小命令。让我们开始吧!
创建一个机器人并获得令牌
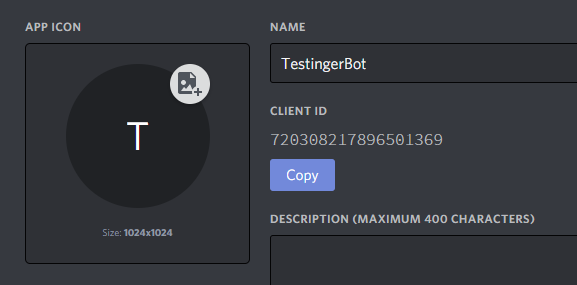
为了向服务器添加机器人,您需要创建自己的应用程序并在“常规信息”选项卡中复制“客户端ID”。
在这里,我们将CLID替换为以前复制的客户端ID。
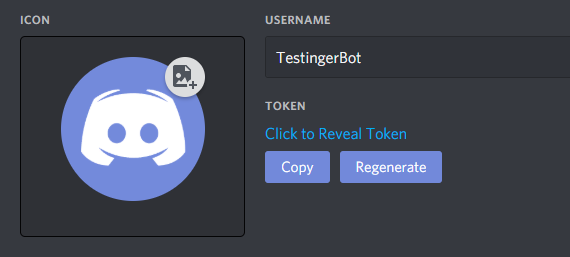
https://discordapp.com/oauth2/authorize?&client_id=CLID&scope=bot&permissions=8在Bot标签中,创建一个Bot并复制令牌。
编码
安装库本身。
pip install discord创建一个config.py文件(这更方便),然后在其中创建字典。
settings = {
    'token': ' ',
    'bot': ' ',
    'id': Client ID ,  ,
    'prefix': ' '
}
我们创建一个主文件,名称可以是任何东西。
我们导入库和配置文件:
import discord
from discord.ext import commands
from config import settings
创建一个机器人“ body”,名称可以是任何一个:
bot = commands.Bot(command_prefix = settings['prefix']) # settings, prefix.让我们开始编写主要代码。
@bot.command() #    pass_context,        .
async def hello(ctx): #      ctx.
    author = ctx.message.author #   author      .

    await ctx.send(f'Hello, {author.mention}!') #     ,    author.
最后,使用以下命令启动机器人:
bot.run(settings['token']) # settings token,
完整的代码
import discord
from discord.ext import commands
from config import settings

bot = commands.Bot(command_prefix = settings['prefix'])

@bot.command() #    pass_context,        .
async def hello(ctx): #      ctx.
    author = ctx.message.author #   author      .
    await ctx.send(f'Hello, {author.mention}!') #     ,    author.

bot.run(settings['token']) #    settings   token,
它看起来应该像这样:

奖金教程!
让我们得出关于狐狸的随机图片的结论。
为此,我们还要导入另外两个库:
import json
import requests
让我们开始编写命令。
@bot.command()
async def fox(ctx):
response = requests.get('https://some-random-api.ml/img/fox') # Get-
json_data = json.loads(response.text) # JSON
embed = discord.Embed(color = 0xff9900, title = 'Random Fox') # Embed'a
embed.set_image(url = json_data['link']) # Embed'a
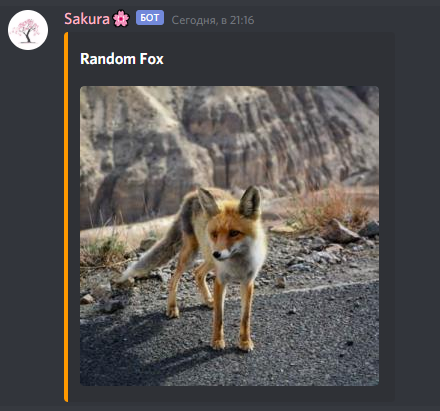
await ctx.send(embed = embed) # Embed它看起来应该像这样:
结束
至此完成了第1部分。第2部分即将推出。