
Rube Goldberg咖啡机
事件驱动的体系结构提高了所用资源的成本效率,因为仅在需要时才使用它们。有许多选项可以实现,而不创建其他云实体作为辅助应用程序。今天,我不再谈论FaaS,而是谈论Webhooks。我将向您展示一个使用对象存储webhooks处理事件的教程示例。
关于对象存储和网络挂钩的几句话。对象存储使您可以将任何数据存储在云中,作为可通过S3或其他HTTP(取决于实现)通过HTTP / HTTPS访问的对象。 Webhooks通常是自定义HTTP回调。它们通常是由事件触发的,例如向存储库提交代码或在博客上发布评论。发生事件时,源站点将HTTP请求发送到为Webhook指定的URL。结果,您可以使一个站点上的事件触发另一站点上的事件(Wiki)。当源站点是对象存储时,事件就是对其内容的更改。
可以使用这种自动化的简单情况示例:
- . « », .
- , , .
- ( , , , ).
- , , Kubernetes, , .
例如,当使用AWS对象存储中的webhooks同步Mail.ru云解决方案(MCS)对象存储桶中的更改时,我们将使任务1变型。在实际负载的情况下,您应该通过在队列中注册webhook来提供异步工作,但是对于教育性任务,我们将在没有这种情况的情况下进行实现。
工作计划
在MCS的S3 Webhooks指南 中详细描述了通信协议。工作计划具有以下要素:
- 位于S3端的发布服务,在webnhook触发时发布HTTP请求。
- 一个Webhook接收服务器,它侦听来自HTTP发布服务的请求并采取适当的措施。可以用任何语言编写服务器,在我们的示例中,我们将使用Go编写服务器。
S3 API中webhook实现的独特之处在于webhook接收服务器在发布服务上的注册。特别是,Webhook接收服务器必须确认对发布服务消息的订阅(在其他Webhook实现中,通常不需要确认订阅)。
因此,webhook接收服务器必须支持两个主要操作:
- 响应发布服务要求确认注册的请求,
- 处理传入事件。
安装服务器以接收Webhook
要运行webhook接收服务器,您需要Linux服务器。在本文中,作为示例,我们使用部署到MCS的虚拟实例。
安装所需的软件并启动webhook服务器。
ubuntu@ubuntu-basic-1-2-10gb:~$ sudo apt-get install git
Reading package lists... Done
Building dependency tree
Reading state information... Done
The following packages were automatically installed and are no longer required:
  bc dns-root-data dnsmasq-base ebtables landscape-common liblxc-common
liblxc1 libuv1 lxcfs lxd lxd-client python3-attr python3-automat
python3-click python3-constantly python3-hyperlink
  python3-incremental python3-pam python3-pyasn1-modules
python3-service-identity python3-twisted python3-twisted-bin
python3-zope.interface uidmap xdelta3
Use 'sudo apt autoremove' to remove them.
Suggested packages:
  git-daemon-run | git-daemon-sysvinit git-doc git-el git-email git-gui
gitk gitweb git-cvs git-mediawiki git-svn
The following NEW packages will be installed:
  git
0 upgraded, 1 newly installed, 0 to remove and 46 not upgraded.
Need to get 3915 kB of archives.
After this operation, 32.3 MB of additional disk space will be used.
Get:1 http://MS1.clouds.archive.ubuntu.com/ubuntu bionic-updates/main
amd64 git amd64 1:2.17.1-1ubuntu0.7 [3915 kB]
Fetched 3915 kB in 1s (5639 kB/s)
Selecting previously unselected package git.
(Reading database ... 53932 files and directories currently installed.)
Preparing to unpack .../git_1%3a2.17.1-1ubuntu0.7_amd64.deb ...
Unpacking git (1:2.17.1-1ubuntu0.7) ...
Setting up git (1:2.17.1-1ubuntu0.7) ...
使用webhook接收服务器克隆文件夹:
ubuntu@ubuntu-basic-1-2-10gb:~$ git clone
https://github.com/RomanenkoDenys/s3-webhook.git
Cloning into 's3-webhook'...
remote: Enumerating objects: 48, done.
remote: Counting objects: 100% (48/48), done.
remote: Compressing objects: 100% (27/27), done.
remote: Total 114 (delta 20), reused 45 (delta 18), pack-reused 66
Receiving objects: 100% (114/114), 23.77 MiB | 20.25 MiB/s, done.
Resolving deltas: 100% (49/49), done.
让我们启动服务器:
ubuntu@ubuntu-basic-1-2-10gb:~$ cd s3-webhook/
ubuntu@ubuntu-basic-1-2-10gb:~/s3-webhook$ sudo ./s3-webhook -port 80
订阅发布服务
您可以注册服务器以通过API或Web界面接收Webhook。为简单起见,我们将通过Web界面进行注册:
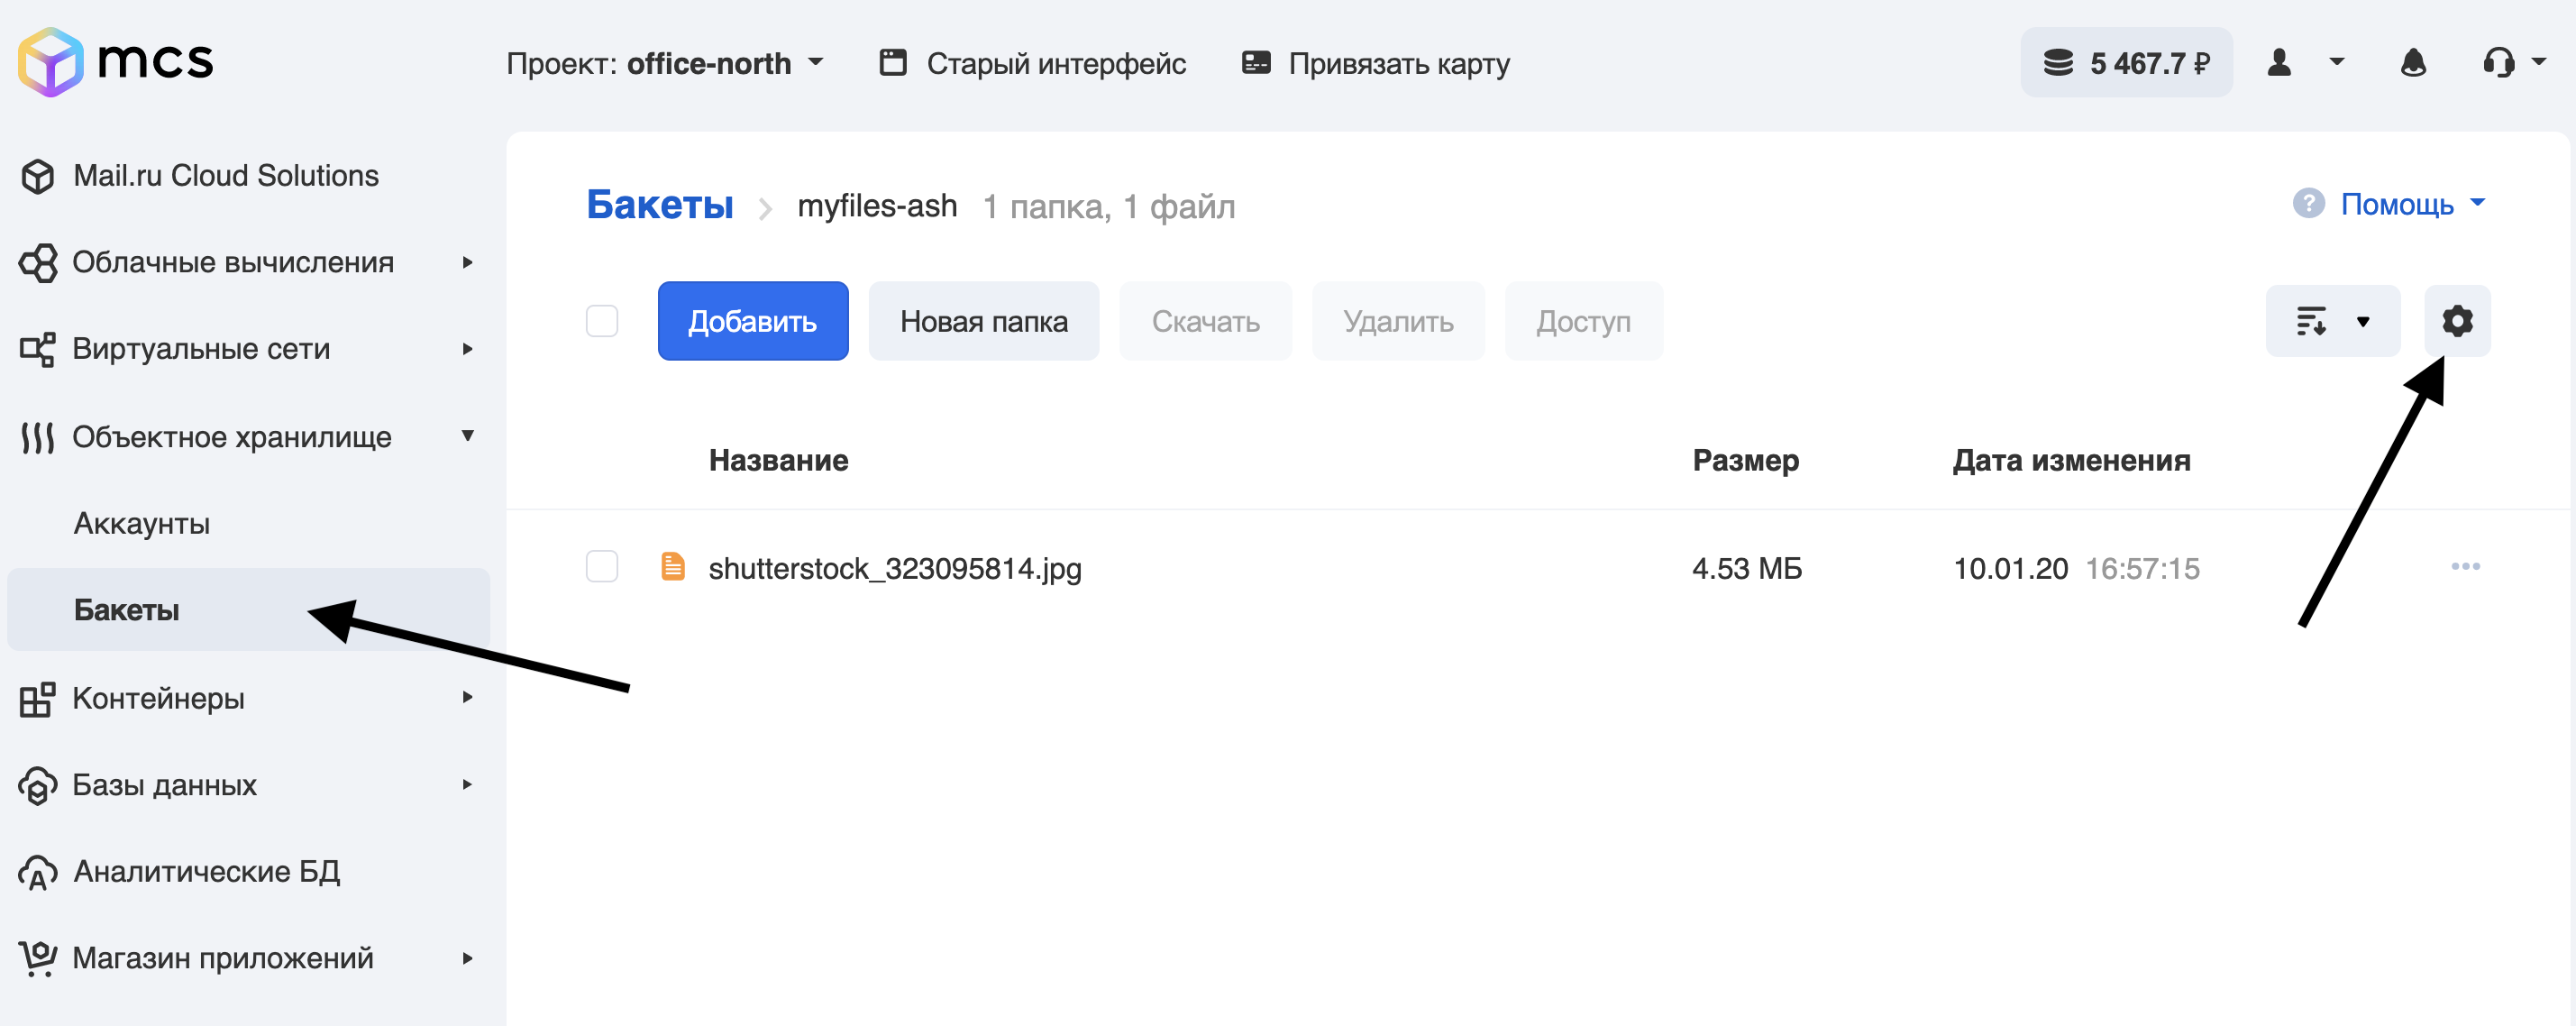
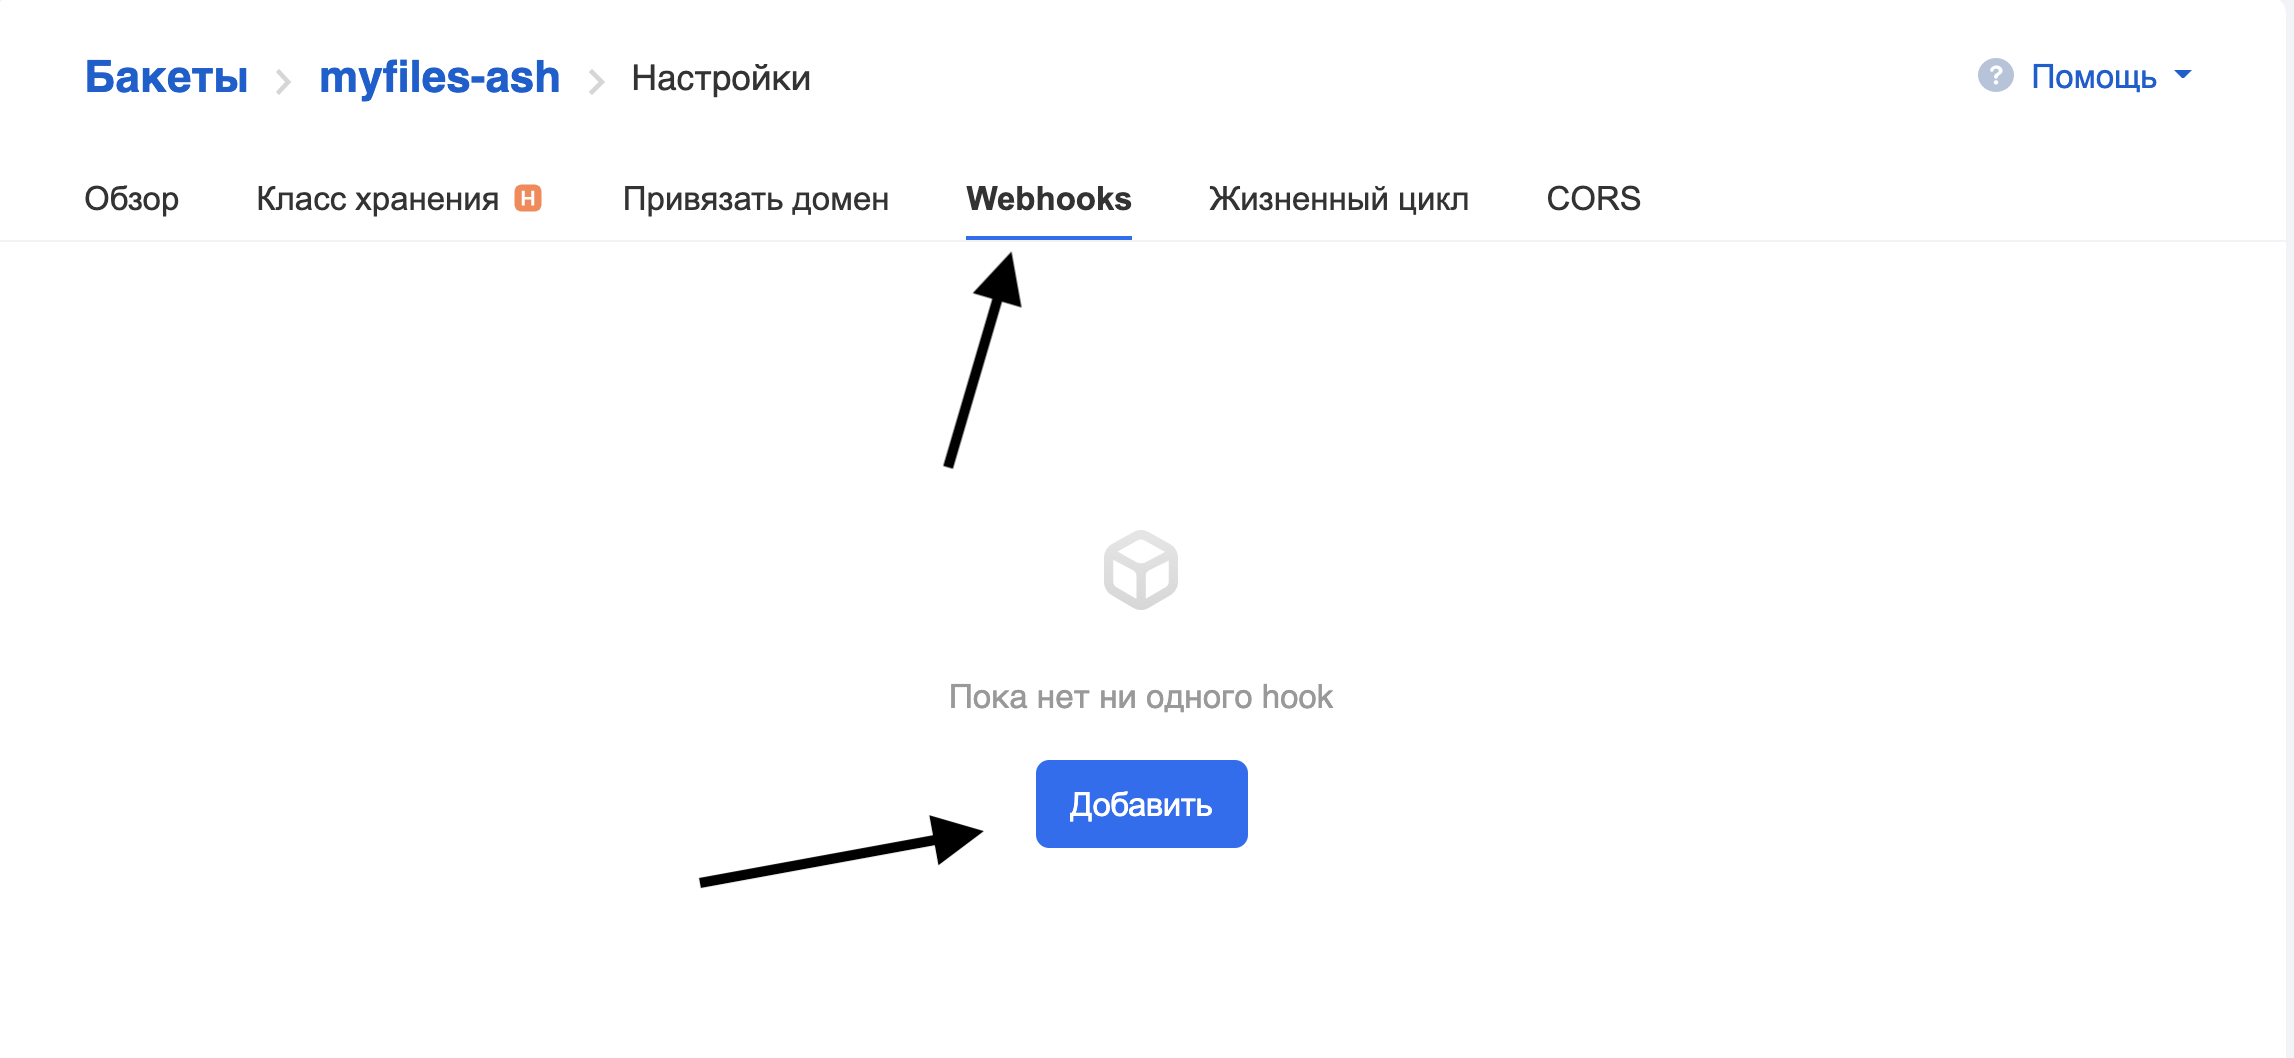
转到“ Webhooks”选项卡,然后单击“添加”:
填写以下字段:
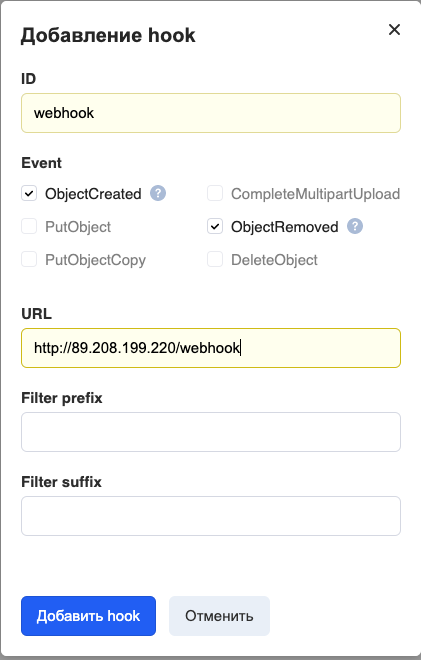
ID- Webhook 的名称。
事件-发送什么事件。我们已经设置了处理文件(添加和删除)时发生的所有事件的传输。
URL-Webhook接收服务器的地址。
过滤器前缀/后缀是一种过滤器,它仅允许名称与某些规则匹配的对象生成网络钩子。例如,要使webhook仅适用于扩展名为.png的文件,请在Filter后缀中输入“ png”。
当前,仅支持端口80和443来访问webhook接收服务器,
单击“ 添加”钩子,然后看到以下内容:
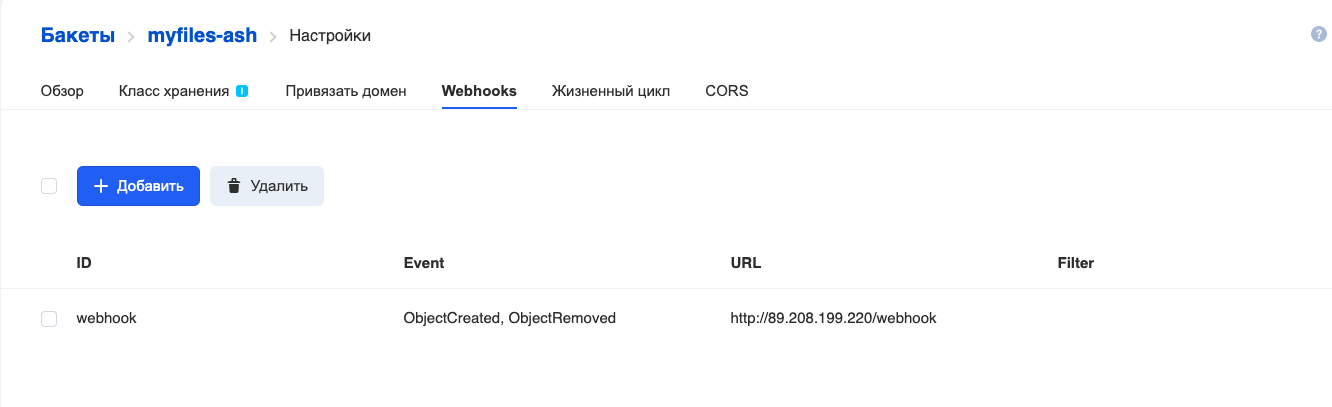
添加了钩子。
日志中用于接收Webhook的服务器显示了Hook注册过程的进度:
ubuntu@ubuntu-basic-1-2-10gb:~/s3-webhook$ sudo ./s3-webhook -port 80
2020/06/15 12:01:14 [POST] incoming HTTP request from
95.163.216.92:42530
2020/06/15 12:01:14 Got timestamp: 2020-06-15T15:01:13+03:00 TopicArn:
mcs5259999770|myfiles-ash|s3:ObjectCreated:*,s3:ObjectRemoved:* Token:
E2itMqAMUVVZc51pUhFWSp13DoxezvRxkUh5P7LEuk1dEe9y URL:
http://89.208.199.220/webhook
2020/06/15 12:01:14 Generate responce signature:
3754ce36636f80dfd606c5254d64ecb2fd8d555c27962b70b4f759f32c76b66d注册结束。在下一节中,我们将仔细研究服务器接收Webhook的算法。
用于接收Webhook的服务器的说明
在我们的示例中,服务器是用Go编写的。让我们分析其工作的基本原理。
package main

// Generate hmac_sha256_hex
func HmacSha256hex(message string, secret string) string {
}

// Generate hmac_sha256
func HmacSha256(message string, secret string) string {
}

// Send subscription confirmation
func SubscriptionConfirmation(w http.ResponseWriter, req *http.Request, body []byte) {
}

// Send subscription confirmation
func GotRecords(w http.ResponseWriter, req *http.Request, body []byte) {
}

// Liveness probe
func Ping(w http.ResponseWriter, req *http.Request) {
    // log request
    log.Printf("[%s] incoming HTTP Ping request from %s\n", req.Method, req.RemoteAddr)
    fmt.Fprintf(w, "Pong\n")
}

//Webhook
func Webhook(w http.ResponseWriter, req *http.Request) {
}

func main() {

    // get command line args
    bindPort := flag.Int("port", 80, "number between 1-65535")
    bindAddr := flag.String("address", "", "ip address in dot format")
    flag.StringVar(&actionScript, "script", "", "external script to execute")
    flag.Parse()

    http.HandleFunc("/ping", Ping)
    http.HandleFunc("/webhook", Webhook)

log.Fatal(http.ListenAndServe(*bindAddr+":"+strconv.Itoa(*bindPort), nil))
}
让我们考虑一下主要功能:
- Ping()是一种通过URL / ping响应的路由,这是活动性探针的最简单实现。
- Webhook()-主路径,URL / webhook处理程序:
- 确认在发布服务上的注册(转换为SubscriptionConfirmation功能),
- 处理传入的Webhooks(Gotrecords函数)。
- HmacSha256和HmacSha256hex函数是HMAC-SHA256和HMAC-SHA256加密算法的实现,其输出为十六进制数字字符串,用于签名减法。
- main是主要功能,可处理命令行参数并注册URL处理程序。
服务器接受的命令行参数:
- -port是服务器将在其上侦听的端口。
- -address是服务器将侦听的IP地址。
- -script是一个外部程序,会在进入的每个钩子上调用它。
让我们仔细看一些功能:
//Webhook
func Webhook(w http.ResponseWriter, req *http.Request) {

    // Read body
    body, err := ioutil.ReadAll(req.Body)
    defer req.Body.Close()
    if err != nil {
        http.Error(w, err.Error(), 500)
        return
    }

    // log request
    log.Printf("[%s] incoming HTTP request from %s\n", req.Method, req.RemoteAddr)
    // check if we got subscription confirmation request
    if strings.Contains(string(body),
"\"Type\":\"SubscriptionConfirmation\"") {
        SubscriptionConfirmation(w, req, body)
    } else {
        GotRecords(w, req, body)
    }

}此功能确定发生了什么-请求注册确认或Webhook。如文档中所述,在注册确认的情况下,Post请求中包含以下Json结构:
POST http://test.com HTTP/1.1
x-amz-sns-messages-type: SubscriptionConfirmation
content-type: application/json

{
    "Timestamp":"2019-12-26T19:29:12+03:00",
    "Type":"SubscriptionConfirmation",
    "Message":"You have chosen to subscribe to the topic $topic. To confirm the subscription you need to response with calculated signature",
    "TopicArn":"mcs2883541269|bucketA|s3:ObjectCreated:Put",
    "SignatureVersion":1,
    "Token":«RPE5UuG94rGgBH6kHXN9FUPugFxj1hs2aUQc99btJp3E49tA»
}
此请求需要回答:
content-type: application/json

{"signature":«ea3fce4bb15c6de4fec365d36bcebbc34ccddf54616d5ca12e1972f82b6d37af»}
签名计算如下:
signature = hmac_sha256(url, hmac_sha256(TopicArn,
hmac_sha256(Timestamp, Token)))
如果Webhook到达,则Post请求的结构如下所示:
POST <url> HTTP/1.1
x-amz-sns-messages-type: SubscriptionConfirmation

{ "Records":
    [
        {
            "s3": {
                "object": {
                    "eTag":"aed563ecafb4bcc5654c597a421547b2",
                    "sequencer":1577453615,
                    "key":"some-file-to-bucket",
                    "size":100
                },
            "configurationId":"1",
            "bucket": {
                "name": "bucketA",
                "ownerIdentity": {
                    "principalId":"mcs2883541269"}
                },
                "s3SchemaVersion":"1.0"
            },
            "eventVersion":"1.0",
            "requestParameters":{
                "sourceIPAddress":"185.6.245.156"
            },
            "userIdentity": {
                "principalId":"2407013e-cbc1-415f-9102-16fb9bd6946b"
            },
            "eventName":"s3:ObjectCreated:Put",
            "awsRegion":"ru-msk",
            "eventSource":"aws:s3",
            "responseElements": {
                "x-amz-request-id":"VGJR5rtJ"
            }
        }
    ]
}因此,根据要求,您需要了解如何处理数据。我选择一条记录作为指标
"Type":"SubscriptionConfirmation",因为该记录存在于确认订阅的请求中,而不存在于Webhook中。根据POST请求中该记录的存在/不存在,进一步的程序执行将进入函数SubscriptionConfirmation或函数GotRecords。
我们不会详细考虑SubscriptionConfirmation函数,它是根据文档中阐述的原理实现的。您可以在项目的git仓库中检查此功能的源代码。
GotRecords函数解析传入的请求,并为每个Record对象使用以下参数调用外部脚本(其名称在-script参数中传递):
- 桶名
- 对象键
- 法案:
- 复制-如果在原始请求中,EventName = ObjectCreated | PutObject | PutObjectCopy
- 删除-如果在原始请求中,EventName = ObjectRemoved | 删除对象
因此,如果与POST请求的钩到达时,如所描述的以上和-script = script.sh参数,那么脚本将被称为如下:
script.sh bucketA some-file-to-bucket copy应当理解,该Webhook接收服务器不是完整的生产解决方案,而是可能实现的简化示例。
工作实例
让我们将MCS中主存储桶的文件同步到AWS中的备份存储桶。主要存储区称为myfiles-ash,备份存储区为myfiles-backup(在AWS上配置存储区超出了本文的范围)。因此,将文件放置在主存储桶中时,其副本应显示在备份中,从主存储桶中删除时,应在备份中将其删除。
我们将使用awscli实用程序使用存储桶,与MCS云存储和AWS云存储兼容的awscli实用程序。
ubuntu@ubuntu-basic-1-2-10gb:~$ sudo apt-get install awscli
Reading package lists... Done
Building dependency tree
Reading state information... Done
After this operation, 34.4 MB of additional disk space will be used.
Unpacking awscli (1.14.44-1ubuntu1) ...
Setting up awscli (1.14.44-1ubuntu1) ...
让我们配置对S3 MCS API的访问权限:
ubuntu@ubuntu-basic-1-2-10gb:~$ aws configure --profile mcs
AWS Access Key ID [None]: hdywEPtuuJTExxxxxxxxxxxxxx
AWS Secret Access Key [None]: hDz3SgxKwXoxxxxxxxxxxxxxxxxxx
Default region name [None]:
Default output format [None]:
让我们配置对AWS S3 API的访问权限:
ubuntu@ubuntu-basic-1-2-10gb:~$ aws configure --profile aws
AWS Access Key ID [None]: AKIAJXXXXXXXXXXXX
AWS Secret Access Key [None]: dfuerphOLQwu0CreP5Z8l5fuXXXXXXXXXXXXXXXX
Default region name [None]:
Default output format [None]:
让我们检查访问权限:
对AWS:
ubuntu@ubuntu-basic-1-2-10gb:~$ aws s3 ls --profile aws
2020-07-06 08:44:11 myfiles-backup
对于MCS,在命令运行时,添加--endpoint-url:
ubuntu@ubuntu-basic-1-2-10gb:~$ aws s3 ls --profile mcs --endpoint-url
https://hb.bizmrg.com
2020-02-04 06:38:05 databasebackups-0cdaaa6402d4424e9676c75a720afa85
2020-05-27 10:08:33 myfiles-ash
已访问。
现在让我们编写一个处理传入钩子的脚本,我们将其称为s3_backup_mcs_aws.sh
#!/bin/bash
# Require aws cli
# if file added — copy it to backup bucket
# if file removed — remove it from backup bucket
# Variables
ENDPOINT_MCS="https://hb.bizmrg.com"
AWSCLI_MCS=`which aws`" --endpoint-url ${ENDPOINT_MCS} --profile mcs s3"
AWSCLI_AWS=`which aws`" --profile aws s3"
BACKUP_BUCKET="myfiles-backup"

SOURCE_BUCKET="${1}"
SOURCE_FILE="${2}"
ACTION="${3}"

SOURCE="s3://${SOURCE_BUCKET}/${SOURCE_FILE}"
TARGET="s3://${BACKUP_BUCKET}/${SOURCE_FILE}"
TEMP="/tmp/${SOURCE_BUCKET}/${SOURCE_FILE}"

case ${ACTION} in
    "copy")
    ${AWSCLI_MCS} cp "${SOURCE}" "${TEMP}"
    ${AWSCLI_AWS} cp "${TEMP}" "${TARGET}"
    rm ${TEMP}
    ;;

    "delete")
    ${AWSCLI_AWS} rm ${TARGET}
    ;;

    *)
    echo "Usage: ${0} sourcebucket sourcefile copy/delete"
    exit 1
    ;;
esac
我们启动服务器:
ubuntu@ubuntu-basic-1-2-10gb:~/s3-webhook$ sudo ./s3-webhook -port 80 -
script scripts/s3_backup_mcs_aws.sh检查它是如何工作的。通过MCS Web界面,在存储桶myfiles-ash中添加test.txt文件。在控制台的日志中,您可以看到已向Webhook服务器发出请求:
2020/07/06 09:43:08 [POST] incoming HTTP request from
95.163.216.92:56612
download: s3://myfiles-ash/test.txt to ../../../tmp/myfiles-ash/test.txt
upload: ../../../tmp/myfiles-ash/test.txt to
s3://myfiles-backup/test.txt
让我们检查AWS中myfiles-backup存储桶的内容:
ubuntu@ubuntu-basic-1-2-10gb:~/s3-webhook$ aws s3 --profile aws ls
myfiles-backup
2020-07-06 09:43:10       1104 test.txt
现在,通过Web界面,从myfiles-ash存储桶中删除文件。
服务器日志:
2020/07/06 09:44:46 [POST] incoming HTTP request from
95.163.216.92:58224
delete: s3://myfiles-backup/test.txt
铲斗含量:
ubuntu@ubuntu-basic-1-2-10gb:~/s3-webhook$ aws s3 --profile aws ls
myfiles-backup
ubuntu@ubuntu-basic-1-2-10gb:~$
文件已删除,问题已解决。
结论和待办事项
本文中使用的所有代码都在我的存储库中。还有脚本示例和计数签名以注册Webhook的示例。
此代码仅是一个示例,说明如何在活动中使用S3 Webhooks。就像我在开始时所说的那样,如果您打算在生产中使用这样的服务器,则必须至少重写服务器以进行异步工作:将传入的Webhooks注册在队列中(RabbitMQ或NATS),然后从那里拆解并由工作程序处理它们。否则,随着大量的Webhooks出现,您可能会遇到服务器资源不足以执行任务的情况。队列的存在使您可以分散服务器和工作器,并在出现故障的情况下解决重复任务的问题。还希望将日志记录更改为更详细,更标准化的记录。
祝好运!
阅读有关该主题的更多信息: