本文介绍了该问题及其解决方案的分析。我不会为您提供针对所有怪物的灵丹妙药,但我将向您展示如何学习特定的灵丹妙药,以便专门为他创建子弹。我将以一个示例说明这一点,该示例说明了我们如何使不断变化的片段的动画与“底表”成为好朋友。
钻石结帐:背景
Diamond Checkout是我们项目的代号。其含义非常简单-减少客户在订购最后阶段所花费的时间。如果旧版本至少需要在两个屏幕上单击四次才能下订单(并且每个新屏幕都可能导致用户失去上下文),那么“钻石结帐”最好只需要在一个屏幕上单击一下。
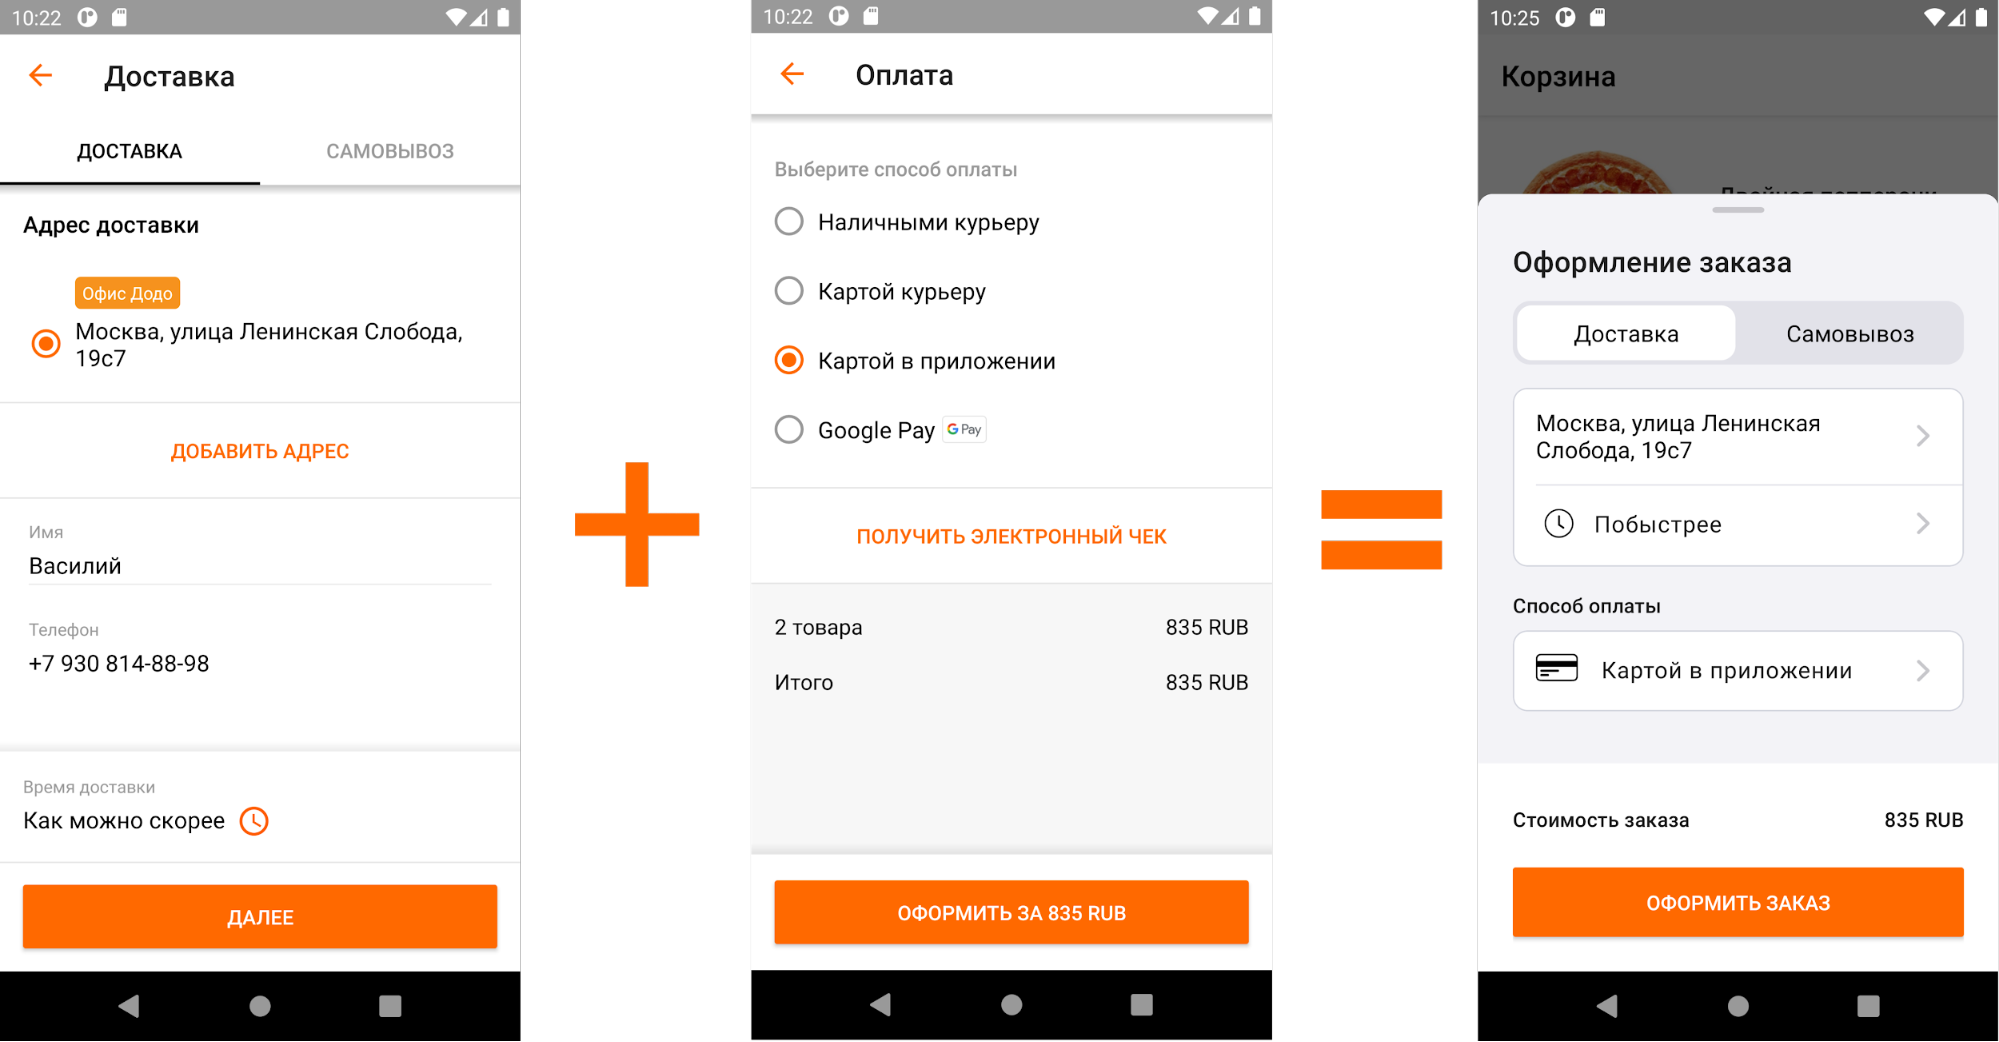
新旧结帐的比较
我们将新屏幕称为“屏幕”。在图片中,您可以看到我们如何从设计师那里收到任务的。此设计解决方案是标准的,在材料设计(包括适用于Android)中描述为“底部工作表”),并在许多应用中以各种形式使用。Google为我们提供了两种现成的实施选项:“模态”和“持久性”。这些方法之间的差异已描述很多,很多文章。

我们认为我们的幕布将是模态的,并且接近一个圆满的结局,但是设计团队一直保持警惕,并没有轻易让这种事情发生。
看看iOS上有哪些很棒的动画。我们也一样吗?
我们不能拒绝这样的挑战!好的,只是在开玩笑,“设计师突然想出了制作动画的要约”,但是关于iOS的部分是真的。
屏幕之间的标准转换(即没有转换)看上去虽然不太笨拙,但没有达到“钻石结帐”的标题。虽然,我在跟谁开玩笑,但这确实很糟糕:

开箱即用的内容
在继续介绍动画的实现之前,我将告诉您过渡的外观。
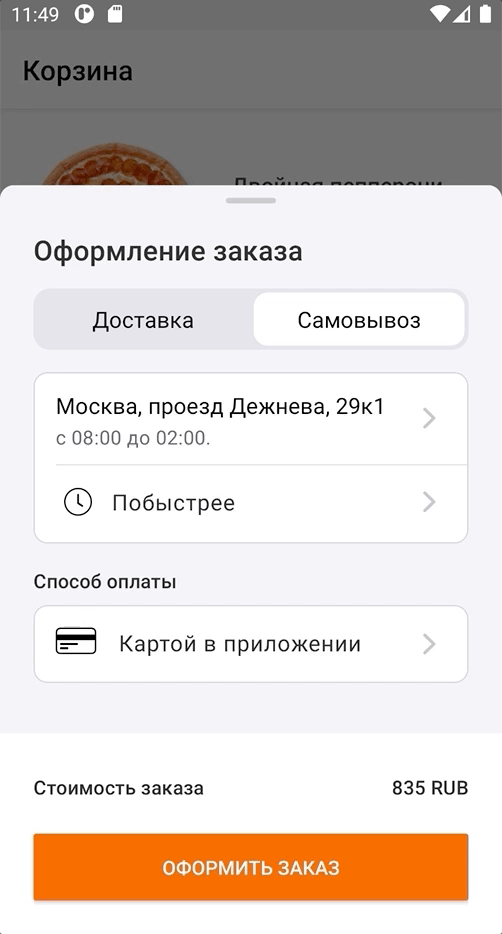
- 客户端单击比萨店的地址字段->作为响应,“ Pickup”片段被打开。它以全屏(按预期的方式)急剧打开,而比萨店的列表则稍有延迟。
- 当客户按下“返回”->时,返回到前一个屏幕时会急剧跳动。
- 当我从底部单击“付款方式”字段->时,“付款方式”片段迅速打开。付款方式的列表会延迟出现;出现时,屏幕会随着跳跃而增加。
- 当您按“返回”时->急剧跳回。
显示数据的延迟是由于将数据异步加载到屏幕上造成的。将来有必要考虑到这一点。
问题实际上是什么:在客户感觉良好的地方,我们有局限性
当屏幕上出现过多的突然移动时,用户不喜欢它。它使人分神和困惑。另外,您总是希望看到对您的动作的顺畅反应,而不是抽搐。
这导致了技术上的局限性:我们决定不应该关闭当前底页并为每次屏幕更改显示一个新的底页,并且在几个底页的上方显示另一个底页也很不好。因此,在我们的实现框架中(每个屏幕都是一个新片段),您只能制作一个底页,该底页应响应用户操作而尽可能平滑地移动。
这意味着我们将拥有一个高度可变的片段容器(因为所有片段的高度都不同),并且我们必须为其高度变化设置动画。
初步标记
“窗帘”的根元素非常简单-它只是一个矩形背景,顶部带有圆角,并且是一个放置碎片的容器。
<?xml version="1.0" encoding="utf-8"?>
<FrameLayout xmlns:android="http://schemas.android.com/apk/res/android"
    android:layout_width="match_parent"
    android:layout_height="wrap_content"
    android:background="@drawable/dialog_gray200_background"
    >

  <androidx.fragment.app.FragmentContainerView
      android:id="@+id/container"
      android:layout_width="match_parent"
      android:layout_height="match_parent"
      />

</FrameLayout>
而且dialog_gray200_background.xml文件如下所示:
<?xml version="1.0" encoding="utf-8"?>
<selector xmlns:android="http://schemas.android.com/apk/res/android">
  <item>
    <shape android:shape="rectangle">
      <solid android:color="@color/gray200" />
      <corners android:bottomLeftRadius="0dp" android:bottomRightRadius="0dp" android:topLeftRadius="10dp" android:topRightRadius="10dp" />
    </shape>
  </item>
</selector>
每个新屏幕都是一个单独的片段,这些片段将使用replace方法替换,此处所有内容都是标准的。
首次尝试实现动画
animateLayoutChanges
让我们 记住古老的精灵魔术animateLayoutChanges,它实际上是默认的LayoutTransition。尽管animateLayoutChanges根本不是为更改片段而设计的,但希望对动画高度有帮助。另外,FragmentContainerView不支持animateLayoutChanges,因此我们将其更改为良好的旧FrameLayout。
<?xml version="1.0" encoding="utf-8"?>
<FrameLayout xmlns:android="http://schemas.android.com/apk/res/android"
    android:layout_width="match_parent"
    android:layout_height="wrap_content"
    android:background="@drawable/dialog_gray200_background"
    >

  <FrameLayout
      android:id="@+id/container"
      android:layout_width="match_parent"
      android:layout_height="match_parent"
      android:animateLayoutChanges="true"
      />

</FrameLayout>
跑:

animateLayoutChanges
如您所见,更改片段时,更改容器的高度确实很生动。进入“分拣”屏幕看起来不错,但其他方面还有很多不足之处。
直觉表明,这条路径将引起设计师的抽搐,因此我们回退更改并尝试其他方法。
setCustomAnimations
FragmentTransaction允许您使用setCustomAnimation方法设置以xml格式描述的动画。为此,请在资源中创建一个名为“ anim”的文件夹,并在其中添加四个动画文件:
to_right_out.xml
<?xml version="1.0" encoding="utf-8"?>
<set xmlns:android="http://schemas.android.com/apk/res/android"
    android:duration="500"
    android:interpolator="@android:anim/accelerate_interpolator"
>
  <translate android:toXDelta="100%" />
</set>
to_right_in.xml
<?xml version="1.0" encoding="utf-8"?>
<set xmlns:android="http://schemas.android.com/apk/res/android"
    android:duration="500"
    android:interpolator="@android:anim/accelerate_interpolator"
>
  <translate android:fromXDelta="-100%" />
</set>
to_left_out.xml
<?xml version="1.0" encoding="utf-8"?>
<set xmlns:android="http://schemas.android.com/apk/res/android"
    android:duration="500"
    android:interpolator="@android:anim/accelerate_interpolator"
>
  <translate android:toXDelta="-100%" />
</set>
to_left_in.xml
<?xml version="1.0" encoding="utf-8"?>
<set xmlns:android="http://schemas.android.com/apk/res/android"
    android:duration="500"
    android:interpolator="@android:anim/accelerate_interpolator"
>
  <translate android:fromXDelta="100%" />
</set>
然后将这些动画设置为事务:
fragmentManager
    .beginTransaction()
    .setCustomAnimations(R.anim.to_left_in, R.anim.to_left_out, R.anim.to_right_in, R.anim.to_right_out)
    .replace(containerId, newFragment)
    .addToBackStack(newFragment.tag)
    .commit()
我们得到以下结果:

setCustomAnimation
该实现的内容:
- 它已经变得更好-您可以看到屏幕如何根据用户操作相互替换。
- 但是由于碎片的高度不同,仍然存在跳跃。这是由于以下事实:在层次结构中移动片段时,只有一个片段。是他自己调整容器的高度,第二个人显示“它是如何发生的”。
- 在付款方式上异步加载数据仍然存在问题-屏幕首先显示为空白,然后填充内容。
不好 结论:您还需要其他东西。
或者也许尝试一下:共享元素过渡
大多数Android开发人员都知道共享元素转换。但是,尽管此工具非常灵活,但是许多人在使用它时会遇到问题,因此并不十分喜欢使用它。

它的本质非常简单-我们可以为元素从一个片段到另一个的过渡设置动画。例如,我们可以将带有动画的第一个片段上的元素(我们称其为“初始元素”)移动到第二个片段上该元素的位置(我们将其称为“最终元素”),同时使第一个片段的其余元素褪色,并以淡入淡出显示第二个片段。需要从一个片段动画到另一个片段的元素称为共享元素。
要设置共享元素,我们需要:
- 将带有transitionName属性的开始元素和结束元素标记为相同的值;
- 为第二个块指定sharedElementEnterTransition。
如果您使用片段的根视图作为共享元素怎么办?也许并非为此发明了共享元素转换。但是,如果您考虑一下,很难找到一个论点,说明为什么此解决方案不起作用。我们要为两个片段之间的开始元素到结束元素设置动画。我没有意识形态上的矛盾。让我们试试吧!
对于“窗帘”内部的每个片段,对于根视图,请指定具有相同值的transitionName属性:
<?xml version="1.0" encoding="utf-8"?>
<androidx.constraintlayout.widget.ConstraintLayout
    xmlns:android="http://schemas.android.com/apk/res/android"
    xmlns:app="http://schemas.android.com/apk/res-auto"
    xmlns:tools="http://schemas.android.com/tools"
    android:layout_width="match_parent"
    android:layout_height="wrap_content"
    android:transitionName="checkoutTransition"
>重要提示:这将起作用,因为我们在块事务中使用REPLACE。如果您使用的是ADD(或使用ADD,并使用previousFragment.hide()隐藏前一个代码段[[请勿这样做]),那么必须动态设置transitionName并在动画结束后将其清除。之所以必须这样做,是因为在当前视图层次结构中的某个时间点不能有两个具有相同transitionName的视图。可以做到这一点,但如果没有这种技巧,那就更好了。如果您确实需要使用ADD,可以在本文中找到实现的灵感。
接下来,您需要指定Transition类,它将负责我们的过渡将如何进行。首先,让我们检查一下现成的东西-使用AutoTransition。
newFragment.sharedElementEnterTransition = AutoTransition()并且我们必须设置要在片段事务中设置动画的共享元素。在我们的例子中,这将是片段的根视图:
fragmentManager
    .beginTransaction()
    .apply{
      if (Build.VERSION.SDK_INT >= Build.VERSION_CODES.LOLLIPOP) {
        addSharedElement(currentFragment.requireView(), currentFragment.requireView().transitionName)
        setReorderingAllowed(true)
      }
    }
    .replace(containerId, newFragment)
    .addToBackStack(newFragment.tag)
    .commit()
重要提示:请注意,从Android Lollipop开始,可以使用transitionName(与整个Transition API一样)。
让我们来看看发生了什么:

AutoTransition
Transition可以正常工作,但是看起来不错。这是因为在块事务期间,只有新块在视图层次结构中。该片段将容器拉伸或缩小到其大小,只有在此之后,它才开始使用过渡进行动画处理。因此,我们仅在新片段的高度高于前一个片段时才能看到动画。
由于标准实施不适合我们,我们该怎么办?当然,您需要
写你的过渡
Transition是Transition API中的类,负责在两个场景之间创建动画(场景)。该API的主要元素:
- 场景是在某个时间点(布局)上元素在屏幕上的排列,以及在其中发生动画的ViewGroup(sceneRoot)。
- “开始场景”是开始时间的场景。
- 结束场景是结束时间点的场景。
- Transition是一个类,用于收集开始和结束场景的属性,并创建一个动画制作器以在它们之间进行动画处理。
我们将在Transition类中使用四种方法:
- fun getTransitionProperties():数组。此方法应返回将设置动画的一组属性。从此方法中,您需要以自由形式返回一个字符串(键)数组,主要的事情是captureStartValues和captureEndValues方法(如下所述)使用这些键写入属性。下面是一个例子。
- fun captureStartValues(transitionValues: TransitionValues). layout' . , , , .
- fun captureEndValues(transitionValues: TransitionValues). , layout' .
- fun createAnimator(sceneRoot: ViewGroup?, startValues: TransitionValues?, endValues: TransitionValues?): Animator?. , , . , , .
Transition
- , Transition.
@TargetApi(VERSION_CODES.LOLLIPOP) class BottomSheetSharedTransition : Transition { @Suppress("unused") constructor() : super() @Suppress("unused") constructor( context: Context?, attrs: AttributeSet? ) : super(context, attrs) } - getTransitionProperties.
View, PROP_HEIGHT, ( ) :
companion object { private const val PROP_HEIGHT = "heightTransition:height" private val TransitionProperties = arrayOf(PROP_HEIGHT) } override fun getTransitionProperties(): Array<String> = TransitionProperties - captureStartValues.
View, transitionValues. transitionValues.values ( Map) c PROP_HEIGHT:
override fun captureStartValues(transitionValues: TransitionValues) {
  transitionValues.values[PROP_HEIGHT] = transitionValues.view.height
}
, . , . , - . « » , , . , . :
override fun captureStartValues(transitionValues: TransitionValues) { // View... transitionValues.values[PROP_HEIGHT] = transitionValues.view.height // ... transitionValues.view.parent .let { it as? View } ?.also { view -> view.updateLayoutParams<ViewGroup.LayoutParams> { height = view.height } } } - captureEndValues.
, View. . . , . . , , , . — view, , . :
override fun captureEndValues(transitionValues: TransitionValues) {
  //     View
  transitionValues.values[PROP_HEIGHT] = getViewHeight(transitionValues.view.parent as View)
}
getViewHeight:
private fun getViewHeight(view: View): Int {
  //
  val deviceWidth = getScreenWidth(view)

  //  View
  val widthMeasureSpec = MeasureSpec.makeMeasureSpec(deviceWidth, MeasureSpec.EXACTLY)
  val heightMeasureSpec = MeasureSpec.makeMeasureSpec(0, MeasureSpec.UNSPECIFIED)

  return view
      //
      .apply { measure(widthMeasureSpec, heightMeasureSpec) }
      //
      .measuredHeight
      //  View       ,
      .coerceAtMost(getScreenHeight(view))
}

private fun getScreenHeight(view: View) =
  getDisplaySize(view).y - getStatusBarHeight(view.context)

private fun getScreenWidth(view: View) =
  getDisplaySize(view).x

private fun getDisplaySize(view: View) =
  Point().also {
    (view.context.getSystemService(
        Context.WINDOW_SERVICE
    ) as WindowManager).defaultDisplay.getSize(it)
  }

private fun getStatusBarHeight(context: Context): Int =
  context.resources
      .getIdentifier("status_bar_height", "dimen", "android")
      .takeIf { resourceId -> resourceId > 0 }
      ?.let { resourceId -> context.resources.getDimensionPixelSize(resourceId) }
      ?: 0
, , — . - . Fade in.
, . . «BottomSheetSharedTransition», :
private fun prepareFadeInAnimator(view: View): Animator = ObjectAnimator.ofFloat(view, View.ALPHA, 0f, 1f) - . .
, :
private fun prepareHeightAnimator(
    startHeight: Int,
    endHeight: Int,
    view: View
) = ValueAnimator.ofInt(startHeight, endHeight)
    .apply {
        val container = view.parent.let { it as View }

        //
        addUpdateListener { animation ->
            container.updateLayoutParams<ViewGroup.LayoutParams> {
                height = animation.animatedValue as Int
            }
        }
    }
ValueAnimator . , . , . , , . , WRAP_CONTENT. , :
private fun prepareHeightAnimator(
    startHeight: Int,
    endHeight: Int,
    view: View
) = ValueAnimator.ofInt(startHeight, endHeight)
    .apply {
        val container = view.parent.let { it as View }

        //
        addUpdateListener { animation ->
            container.updateLayoutParams<ViewGroup.LayoutParams> {
                height = animation.animatedValue as Int
            }
        }

        //      WRAP_CONTENT
        doOnEnd {
            container.updateLayoutParams<ViewGroup.LayoutParams> {
                height = ViewGroup.LayoutParams.WRAP_CONTENT
            }
        }
    }
, . - . createAnimator.
override fun createAnimator( sceneRoot: ViewGroup?, startValues: TransitionValues?, endValues: TransitionValues? ): Animator? { if (startValues == null || endValues == null) { return null } val animators = listOf<Animator>( prepareHeightAnimator( startValues.values[PROP_HEIGHT] as Int, endValues.values[PROP_HEIGHT] as Int, endValues.view ), prepareFadeInAnimator(endValues.view) ) return AnimatorSet() .apply { interpolator = FastOutSlowInInterpolator() duration = ANIMATION_DURATION playTogether(animators) } } - .
Transititon'. , . , . «createAnimator» . ?
- Fade' , .
- «captureStartValues» , , WRAP_CONTENT.
, . : , , Transition'. :
companion object {
    private const val PROP_HEIGHT = "heightTransition:height"
    private const val PROP_VIEW_TYPE = "heightTransition:viewType"

    private val TransitionProperties = arrayOf(PROP_HEIGHT, PROP_VIEW_TYPE)
}

override fun getTransitionProperties(): Array<String> = TransitionProperties

override fun captureStartValues(transitionValues: TransitionValues) {
    //    View...
    transitionValues.values[PROP_HEIGHT] = transitionValues.view.height
    transitionValues.values[PROP_VIEW_TYPE] = "start"

    // ...
    transitionValues.view.parent
        .let { it as? View }
        ?.also { view ->
            view.updateLayoutParams<ViewGroup.LayoutParams> {
                height = view.height
            }
        }

}

override fun captureEndValues(transitionValues: TransitionValues) {
    //     View
    transitionValues.values[PROP_HEIGHT] = getViewHeight(transitionValues.view.parent as View)
    transitionValues.values[PROP_VIEW_TYPE] = "end"
}
, «PROP_VIEW_TYPE», «captureStartValues» «captureEndValues» . , ! - Transition.
newFragment.sharedElementEnterTransition = BottomSheetSharedTransition()
为了使动画能够按时开始并看起来不错,您只需要推迟片段(以及相应的动画)之间的过渡,直到加载数据为止。为此,请在fragment中调用postponeEnterTransition方法。完成长数据加载任务后,请记住调用startPostponedEnterTransition。我敢肯定您知道这个窍门,但是再次提醒您也没什么坏处。
总之:到底发生了什么
使用新的BottomSheetSharedTransition并在异步加载数据时使用postponeEnterTransition,我们得到了以下动画:
在扰流板下有一个现成的类BottomSheetSharedTransition
package com.maleev.bottomsheetanimation

import android.animation.Animator
import android.animation.AnimatorSet
import android.animation.ObjectAnimator
import android.animation.ValueAnimator
import android.annotation.TargetApi
import android.content.Context
import android.graphics.Point
import android.os.Build
import android.transition.Transition
import android.transition.TransitionValues
import android.util.AttributeSet
import android.view.View
import android.view.ViewGroup
import android.view.WindowManager
import android.view.animation.AccelerateInterpolator
import androidx.core.animation.doOnEnd
import androidx.core.view.updateLayoutParams

@TargetApi(Build.VERSION_CODES.LOLLIPOP)
class BottomSheetSharedTransition : Transition {

    @Suppress("unused")
    constructor() : super()

    @Suppress("unused")
    constructor(
        context: Context?,
        attrs: AttributeSet?
    ) : super(context, attrs)

    companion object {
        private const val PROP_HEIGHT = "heightTransition:height"

        // the property PROP_VIEW_TYPE is workaround that allows to run transition always
        // even if height was not changed. It's required as we should set container height
        // to WRAP_CONTENT after animation complete
        private const val PROP_VIEW_TYPE = "heightTransition:viewType"
        private const val ANIMATION_DURATION = 400L

        private val TransitionProperties = arrayOf(PROP_HEIGHT, PROP_VIEW_TYPE)
    }

    override fun getTransitionProperties(): Array<String> = TransitionProperties

    override fun captureStartValues(transitionValues: TransitionValues) {
        //    View...
        transitionValues.values[PROP_HEIGHT] = transitionValues.view.height
        transitionValues.values[PROP_VIEW_TYPE] = "start"

        // ...
        transitionValues.view.parent
            .let { it as? View }
            ?.also { view ->
                view.updateLayoutParams<ViewGroup.LayoutParams> {
                    height = view.height
                }
            }

    }

    override fun captureEndValues(transitionValues: TransitionValues) {
        //     View
        transitionValues.values[PROP_HEIGHT] = getViewHeight(transitionValues.view.parent as View)
        transitionValues.values[PROP_VIEW_TYPE] = "end"
    }

    override fun createAnimator(
        sceneRoot: ViewGroup?,
        startValues: TransitionValues?,
        endValues: TransitionValues?
    ): Animator? {
        if (startValues == null || endValues == null) {
            return null
        }

        val animators = listOf<Animator>(
            prepareHeightAnimator(
                startValues.values[PROP_HEIGHT] as Int,
                endValues.values[PROP_HEIGHT] as Int,
                endValues.view
            ),
            prepareFadeInAnimator(endValues.view)
        )

        return AnimatorSet()
            .apply {
                duration = ANIMATION_DURATION
                playTogether(animators)
            }
    }

    private fun prepareFadeInAnimator(view: View): Animator =
        ObjectAnimator
            .ofFloat(view, "alpha", 0f, 1f)
            .apply { interpolator = AccelerateInterpolator() }

    private fun prepareHeightAnimator(
        startHeight: Int,
        endHeight: Int,
        view: View
    ) = ValueAnimator.ofInt(startHeight, endHeight)
        .apply {
            val container = view.parent.let { it as View }

            //
            addUpdateListener { animation ->
                container.updateLayoutParams<ViewGroup.LayoutParams> {
                    height = animation.animatedValue as Int
                }
            }

            //      WRAP_CONTENT
            doOnEnd {
                container.updateLayoutParams<ViewGroup.LayoutParams> {
                    height = ViewGroup.LayoutParams.WRAP_CONTENT
                }
            }
        }

    private fun getViewHeight(view: View): Int {
        //
        val deviceWidth = getScreenWidth(view)

        //  View
        val widthMeasureSpec =
            View.MeasureSpec.makeMeasureSpec(deviceWidth, View.MeasureSpec.EXACTLY)
        val heightMeasureSpec =
            View.MeasureSpec.makeMeasureSpec(0, View.MeasureSpec.UNSPECIFIED)

        return view
            // :
            .apply { measure(widthMeasureSpec, heightMeasureSpec) }
            //   :
            .measuredHeight
            //  View       ,     :
            .coerceAtMost(getScreenHeight(view))
    }

    private fun getScreenHeight(view: View) =
        getDisplaySize(view).y - getStatusBarHeight(view.context)

    private fun getScreenWidth(view: View) =
        getDisplaySize(view).x

    private fun getDisplaySize(view: View) =
        Point().also { point ->
            view.context.getSystemService(Context.WINDOW_SERVICE)
                .let { it as WindowManager }
                .defaultDisplay
                .getSize(point)
        }

    private fun getStatusBarHeight(context: Context): Int =
        context.resources
            .getIdentifier("status_bar_height", "dimen", "android")
            .takeIf { resourceId -> resourceId > 0 }
            ?.let { resourceId -> context.resources.getDimensionPixelSize(resourceId) }
            ?: 0
}
当我们有一个现成的Transition类时,其应用可以归结为简单的步骤:
步骤1.在片段事务中,添加一个Shared Element并设置Transition:
private fun transitToFragment(newFragment: Fragment) {
    val currentFragmentRoot = childFragmentManager.fragments[0].requireView()

    childFragmentManager
        .beginTransaction()
        .apply {
            if (Build.VERSION.SDK_INT >= Build.VERSION_CODES.LOLLIPOP) {
                addSharedElement(currentFragmentRoot, currentFragmentRoot.transitionName)
                setReorderingAllowed(true)

                newFragment.sharedElementEnterTransition = BottomSheetSharedTransition()
            }
        }
        .replace(R.id.container, newFragment)
        .addToBackStack(newFragment.javaClass.name)
        .commit()
}
步骤2.在片段的标记(当前片段和下一个片段)中,应在BottomSheetDialogFragment内进行动画处理,设置transitionName:
<?xml version="1.0" encoding="utf-8"?>
<androidx.constraintlayout.widget.ConstraintLayout
    xmlns:android="http://schemas.android.com/apk/res/android"
    xmlns:app="http://schemas.android.com/apk/res-auto"
    xmlns:tools="http://schemas.android.com/tools"
    android:layout_width="match_parent"
    android:layout_height="wrap_content"
    android:transitionName="checkoutTransition"
    >
仅此而已。
可以做不同的事情吗?
解决问题总是有几种选择。我想提一下我们尚未尝试过的其他可能方法:
- 沟渠片段,将一个片段与多个视图一起使用,并为特定的视图设置动画。这使您可以更好地控制动画,但是却失去了片段的好处:本机导航支持和开箱即用的生命周期处理(您必须自己实现)。
- MotionLayout. MotionLayout , , , .
- . , , . Bottom Sheet Bottom Sheet .
- Bottom Sheet . — .
GitHub. Android- ( ) .