我们将继续使用JointJS更新Voximplant套件。我们很高兴地宣布实时通话记录的出现。请记住,它们还活着多少,并对普通用户是否有害。
以前,用户只能使用通话记录来分析Voximplant Kit中的通话。除了音频之外,我们还希望不仅制作文本日志,还希望提供一种更方便的工具来查看呼叫详细信息和分析错误。由于我们正在处理低代码/无代码产品,因此出现了可视化日志的想法。
什么是盐?/新概念
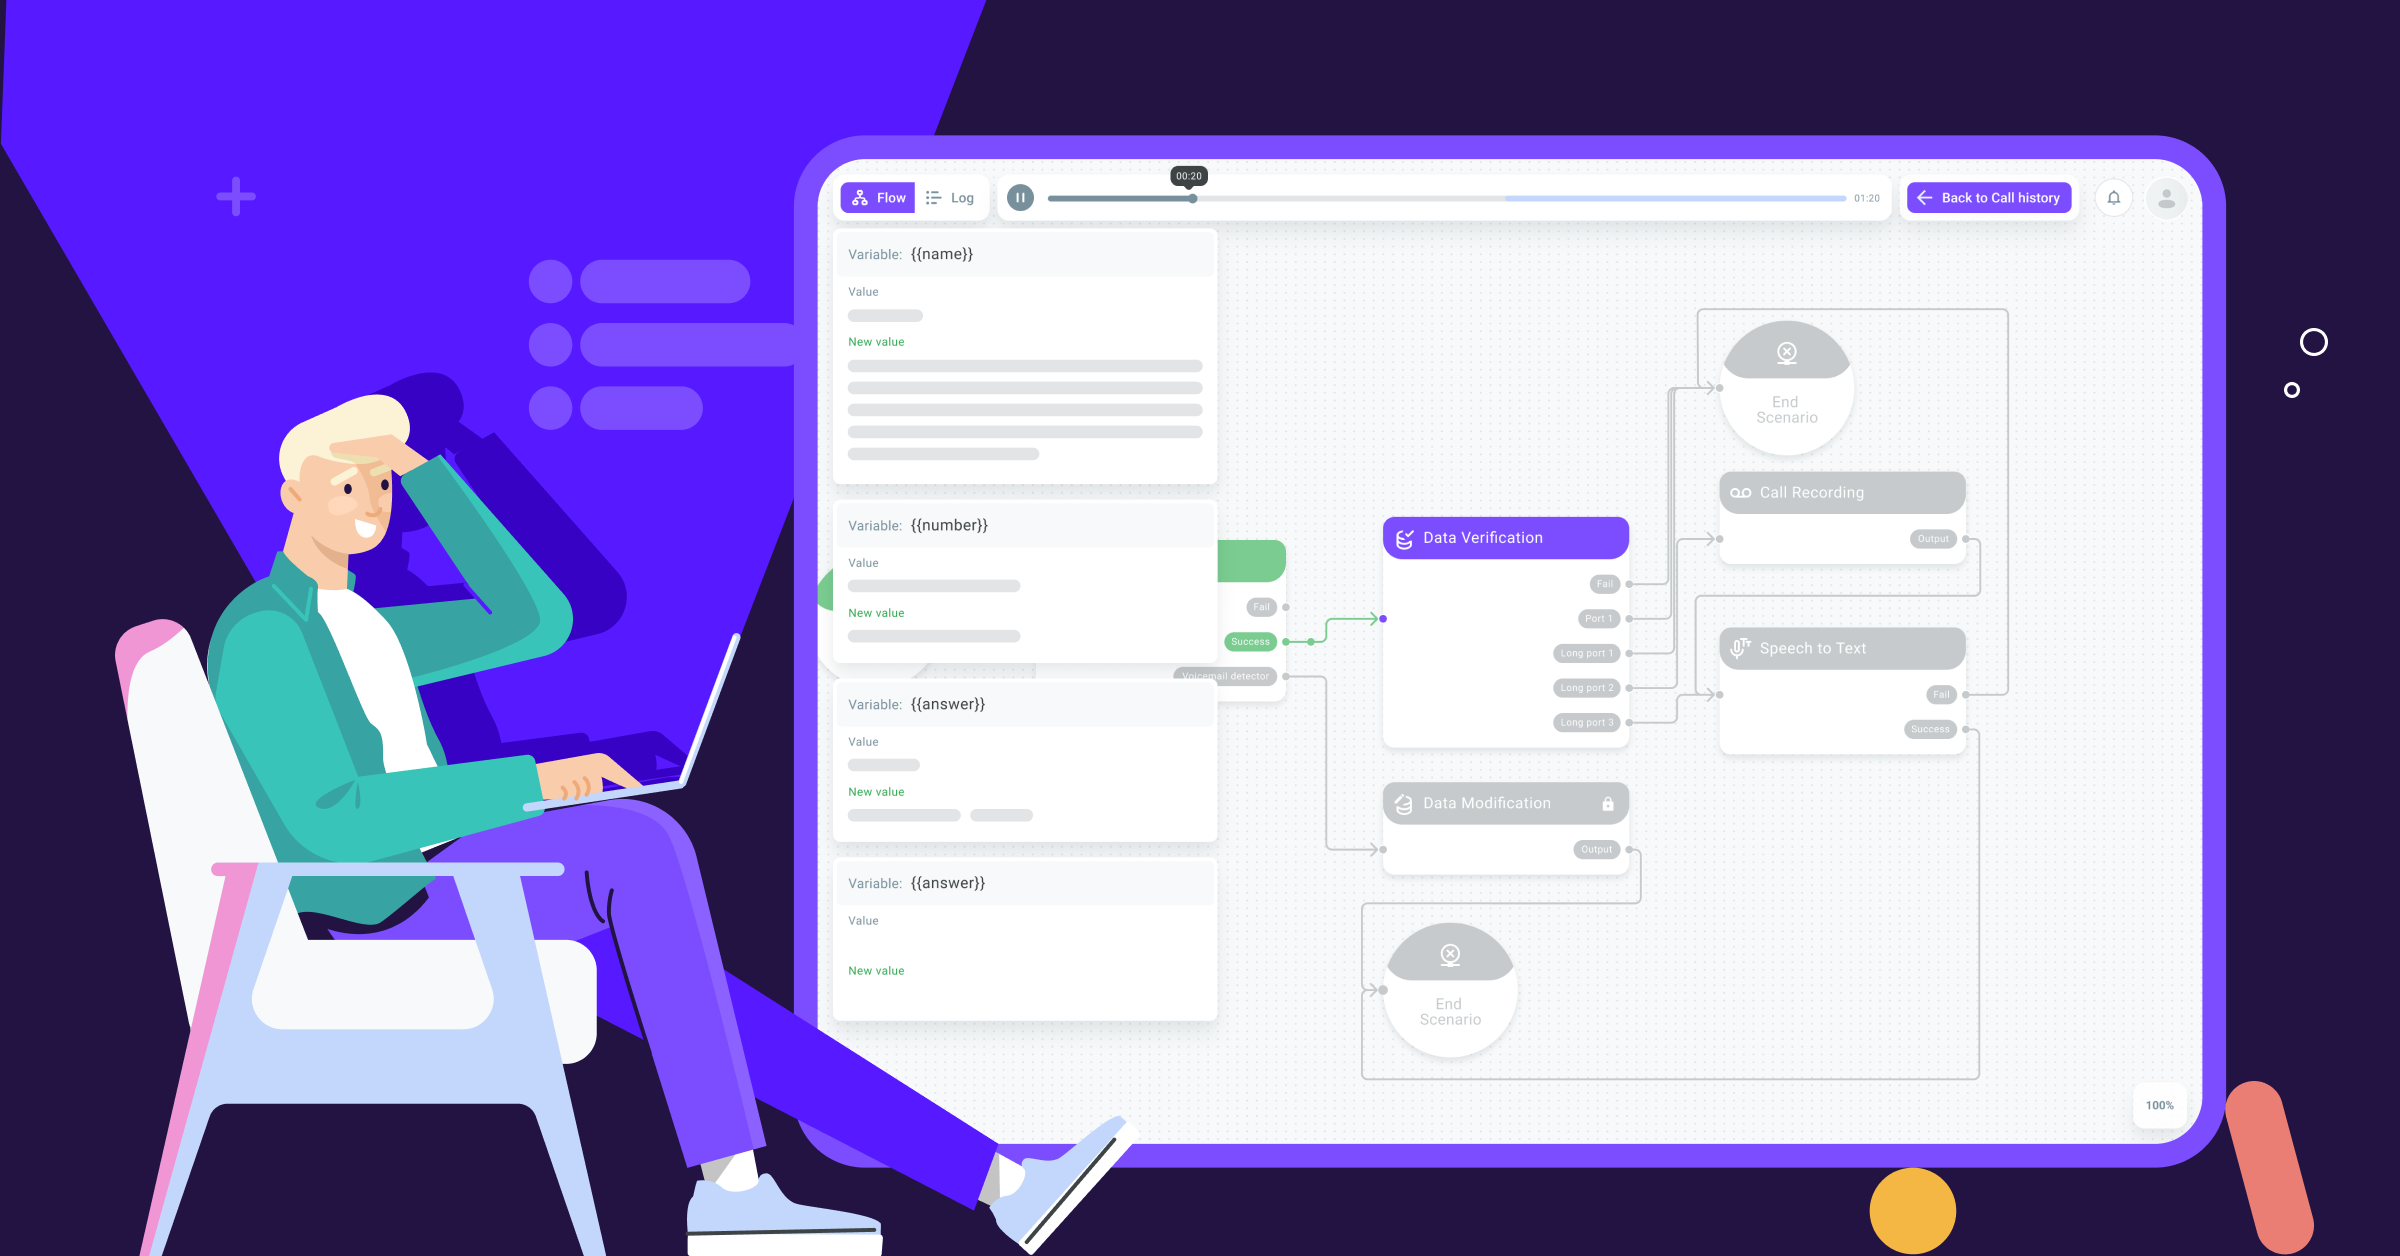
现在,所有呼叫结果都可以作为传递的块链使用,其动画类似于演示模式。预先仅在此处突出显示路径:您可以直观地跟踪客户端在脚本中的移动方式。
要做到这一点,去历史的标签呼出或者呼入呼叫或所选广告活动中的报表,然后单击“查看日志”。然后,编辑器将逐步演示调用中发生的情况。

控制
控制停止/开始(1)停止/继续播放,以及向后/下一个(2)将用户定向移动到上一个/下一个块的开头。您也可以简单地单击时间线以从特定时间点开始播放,就像播放歌曲一样。
如果脚本包括对话记录,那么它将与在块中移动同时播放。时间轴上的音频录制以单独的颜色突出显示(3)。

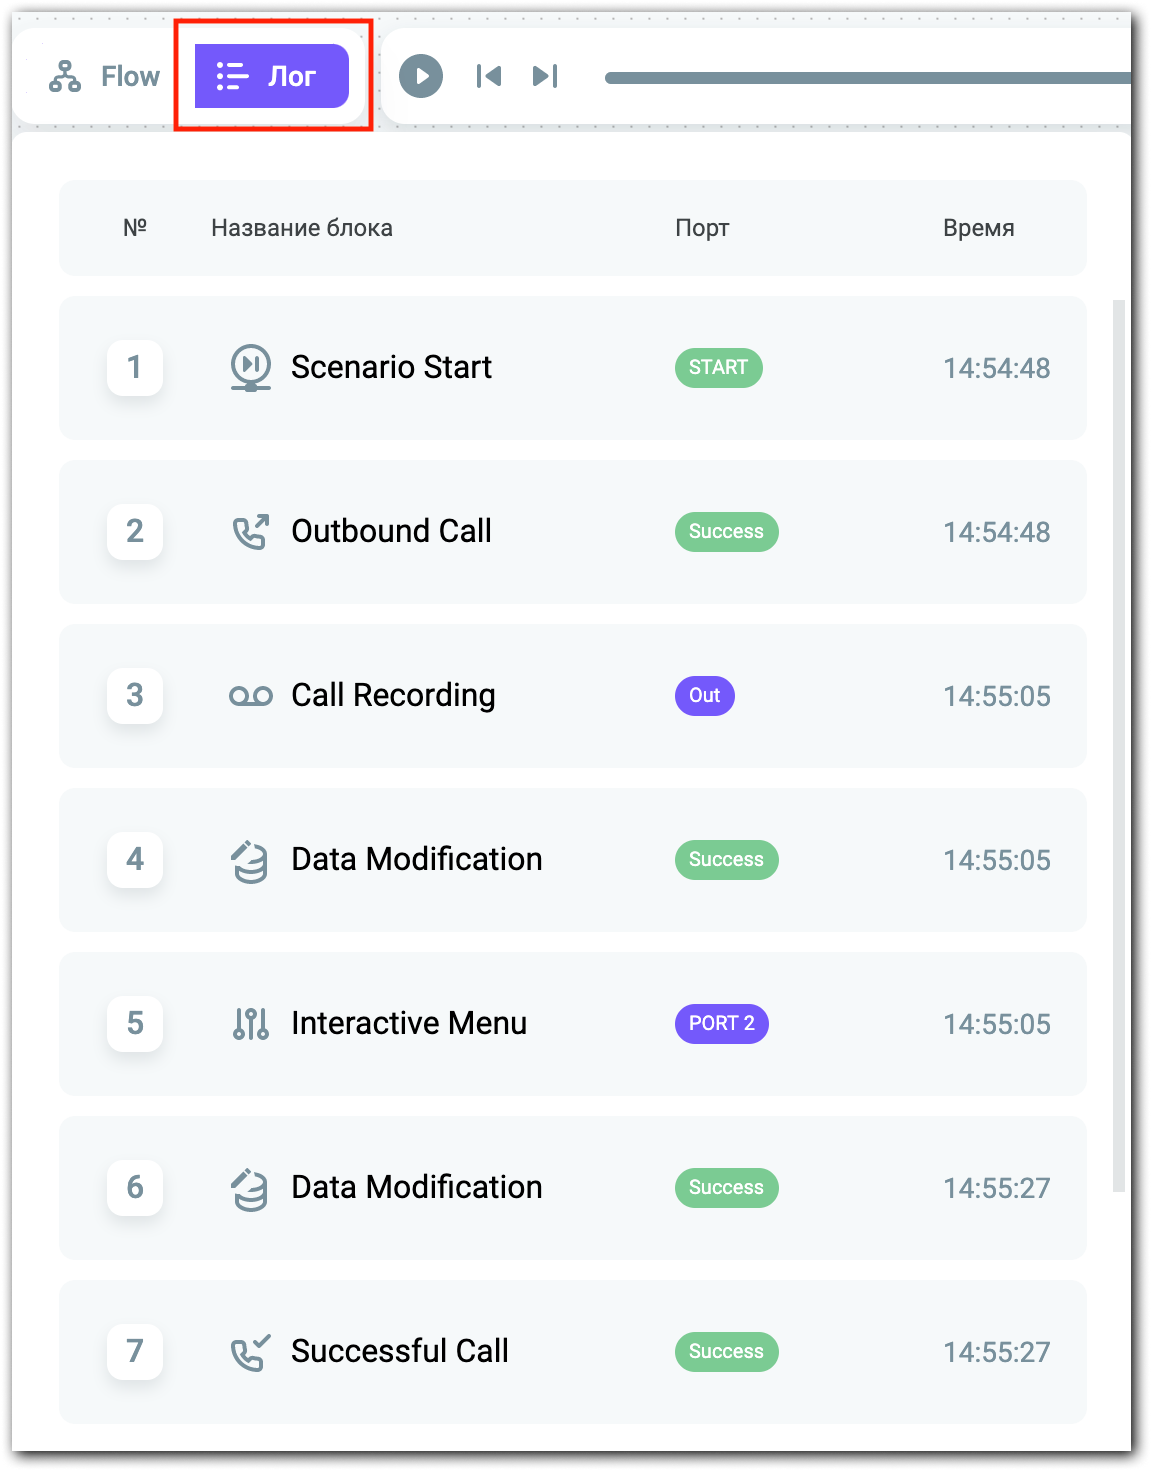
为了方便用户,还提供了带有时间戳的已传递块的列表(“日志”):
破坏者:
我们计划在“日志”选项卡中显示块的详细信息。它们将帮助我们了解为什么该块在特定端口上退出以及是否存在任何错误。例如,对于识别单元,我们将看到结果和识别错误。
复杂的块,例如DialogFlowConnector,IVR,ASR等,将在这里引起最大的兴趣。
变数
根据时间顺序,已更改的变量以通知弹出窗口的形式显示在左侧。也就是说,如果我们移至“更改数据”块,将弹出在那里更改的变量。让我们远离它(时间轴上超过4秒)-变量将消失,直到我们再次在发生更改的时间间隔内找到自己:

生活骇客
即使更改或删除脚本,呼叫日志仍保持其原始形式。这意味着恢复脚本逻辑不会有任何问题:如有必要,您始终可以参考日志。
您可以在Voximplant Kit上亲身感受原木。
那么,里面有什么?
让我们看看如何在代码中实现动态日志。可以这么说,就像在演示模式中一样,在Joint JS中,我们仅选择了动画和块选择。其余的(可以在此基础上做什么)是我们的想象力。
顺便说一句,要了解有关演示模式内部的更多信息,请阅读我们的上一篇文章。
我们得到时间点
当转到日志查看器时,服务器发送的数据包含所有传递的块的列表,进入它们的日期和时间以及在调用过程中更改的变量的列表。换句话说,在最前面,我们得到两个对象数组:log_path和log_variables。
另外,如果记录了对话,则服务器响应中将包含指向音频及其持续时间的链接。

根据进入块的时间,我们以毫秒为单位计算时间点,并为每个块和变量写入时间点。参考点(0毫秒)是进入第一个程序段的时间。因此,如果我们在通话开始后5秒钟进入第二个区块,则第二个区块的时间点= 5000毫秒。使用这些时间点,我们可以计算日志的总持续时间。
更新时间表
按下播放按钮后,时间轴每10毫秒开始更新。在每次更新期间,我们都会检查当前时间是否与以下时间点之一匹配:
const found = this.timePoints.find((item) => item === this.playTime);如果存在匹配项,我们将搜索其时间点=当前时间+ 600 ms(发生块之间运动的时间)的所有块。
updatePlayTime()方法的代码:
updatePlayTime(): void {
    const interval = 10;
    let expected = Date.now() + interval;

    const tick = () => {
        const drift = Date.now() - expected;
        const found = this.timePoints.find((item) => item === this.playTime);
        this.$emit('update', {
            time: this.playTime,
            found: found !== undefined
        });

        if (this.playTime >= this.duration) {
            this.isPlay = false;
            this.playTime = this.duration;
            clearTimeout(this.playInterval);
            this.$emit('end', this.playTime);
            return;
        }

        expected += interval;

        this.playTime += 0.01;
        this.playTime = +this.playTime.toFixed(2);

        this.updateProgress();

        this.playInterval = window.setTimeout(tick, Math.max(0, interval - drift));
    };

    this.playInterval = window.setTimeout(tick, 10);
}
另外,每隔90毫秒,我们就会检查更改的变量的当前时间和时间点+ 4000毫秒(有关变量更改的通知挂起的时间)是否匹配。
选择块
找到所有匹配项后,将块添加到队列中以选择和启动链接动画。
如果有几个块的时间点=当前时间+ 600毫秒,则过渡仅动画到最后一个:
if (i === blocks.length - 1) {
    await this.selectBlock(blocks[i], 600, true, true);
}这是必需的,因为有些块的处理速度非常快。例如,“数据验证”,“更改数据”等。-1秒内可以遍历几个程序段。如果按顺序为它们设置动画,则时间轴会有滞后。
OnUpdateTimeline方法代码:
async onUpdateTimeline({
    time,
    found
}) {
    this.logTimer = time * 1000; //
    this.checkHistoryNotify();

    if (!found) return;

    //        + 600
    const blocks = this.callHistory.log_path.filter((item) => {
        return item.timepoint >= this.logTimer && item.timepoint < this.logTimer + 600;
    });

    if (blocks.length) {
        this.editor.unselectAll();

        for (let i = 0; i < blocks.length; i++) {

            if (i === blocks.length - 1) {
                await this.selectBlock(blocks[i], 600, true, true);

                const cell = this.editor.getCellById(blocks[i].idTarget);
                this.editor.select(cell);
            } else {
                await this.selectBlock(blocks[i], 0, false, true);
            }
        }
    }
}
因此,有一圈是巧合-我们选择块,如果该块已经在队列中-我们什么也不做。
selectBlock()方法可以帮助我们:
async selectBlock(voxHistory, timeout = 700, animate = true, animateLink = true) {
    const inQueue = this.selectQueue.find((item) => item[0].targetId === voxHistory.idTarget);

    if (!inQueue) this.selectQueue.push(arguments);

    return this.exeQueue();
}
倒带
倒带相同的原理:移动时间线时,我们有时间倒带,并从时间点长于当前时间的所选块中删除:
const forSelect = this.callHistory.log_path.filter((item) => {
        const time = accurate ? item.accurateTime : item.timepoint;
        return time <= this.logTimer;
    });
我们将动画过渡到最后一个。
OnRewind()方法代码:
async onRewind({
    time,
    accurate
}, animation = true) {
    this.editor.unselectAll();
    this.stopLinksAnimation();
    this.checkHistoryNotify(true);

    const forSelect = this.callHistory.log_path.filter((item) => {
        const time = accurate ? item.accurateTime : item.timepoint;
        return time <= this.logTimer;
    });

    for (let i = 0; i < forSelect.length; i++) {
        if (i === forSelect.length - 1) {
            await this.selectBlock(forSelect[i], 600, animation, false);
            const cell = this.editor.getCellById(forSelect[i].idTarget);
            this.editor.select(cell);
        } else {
            await this.selectBlock(forSelect[i], 0, false, false);
        }
    }

    if (this.isPlay) this.restartAnimateLink();

    this.onEndTimeline();
}
播放音讯
打开/关闭音频录制更加容易。如果时间线与录制的开始时间一致,则它开始播放,然后时间同步。updatePlayer()方法负责:
updatePlayer() {
    if (this.playTime >= this.recordStart && this.player.paused && !this.isEndAudio) {
        this.player.play();
        this.player.currentTime = this.playTime - this.recordStart;
    } else if (this.playTime < this.recordStart && !this.player.paused) {
        this.player.pause();
    }
}就这样!这是基于联合JS方法和开发人员的创造力而出现的实时日志的方式。如果还没有,请确保自己进行测试:)
如果您喜欢我们有关Keith Updates的系列文章,那就太好了。我们将继续与您分享最新鲜,最有趣的!